iPhone 用 Twitter クライアントアプリの投稿画面をいくつか集めてみた。だいたい同じような UI をしている。
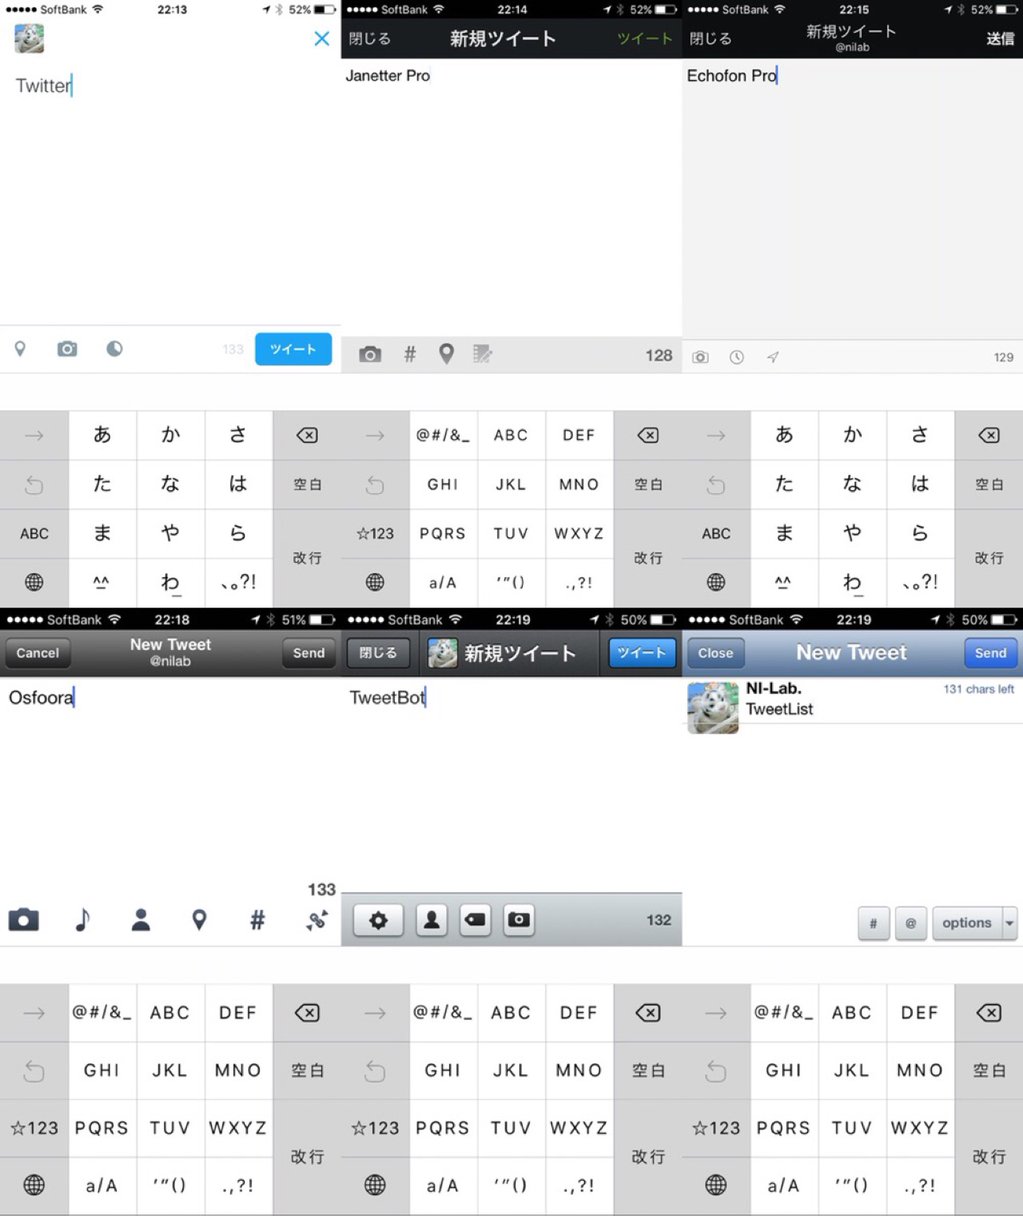
→ iOS アプリの Twitter 投稿画面あれこれ (iOS_Twitter_Post_Screen - MemoWiki)
これらの画面を参考にして、Twitter でツイートを投稿する画面のテンプレート的な UI を Swift で書いてみた。
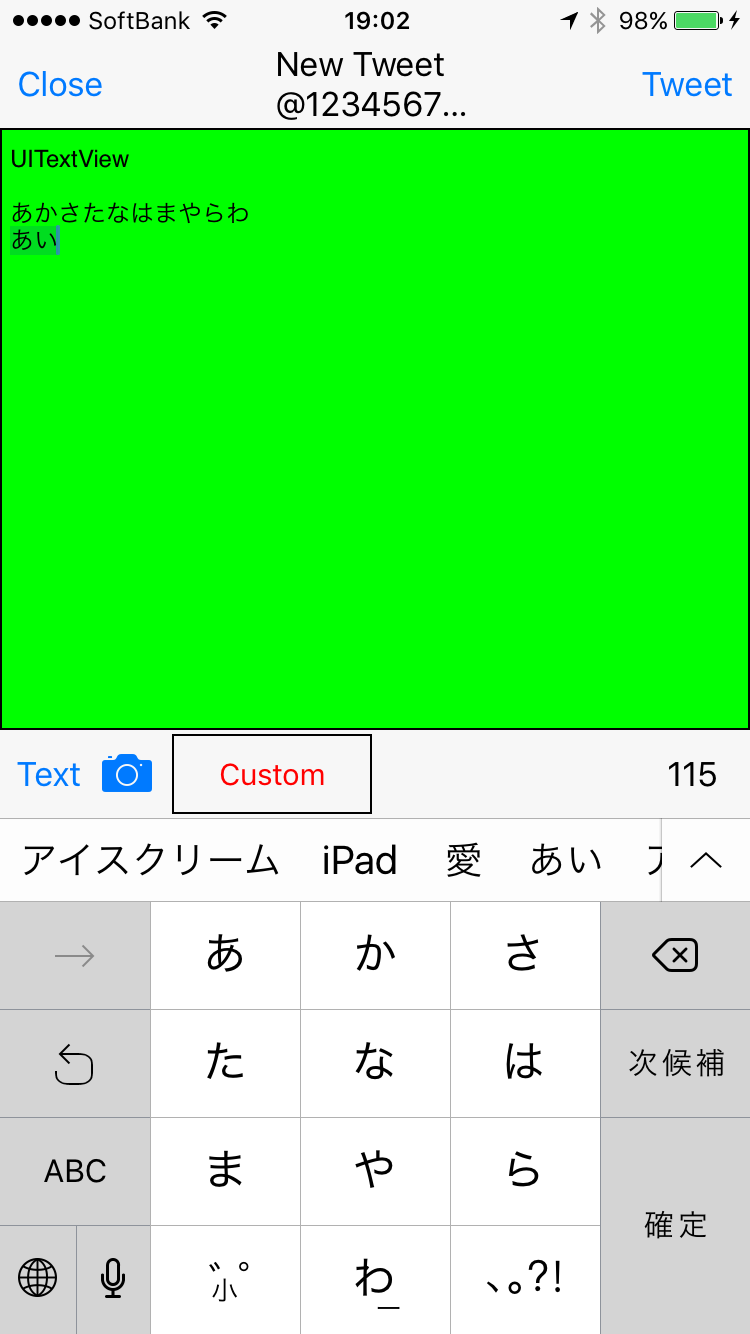
Storyboard を使わずに、サンプルコードをコピペするだけで UI を構築できるようにしてある (ファイルの追加は必要)。
UI部分のみで、ツイート機能などの実装はしていない。そのへんの機能が必要な場合は、このへんを参照 → [ヅ] Swift で位置情報付きの Twitter 投稿するサンプルコード (Storyboard を使わないお手軽コピペ版) (2015-12-09)
今回の動作確認環境: Xcode Version 7.2 + Swift 2.1.1 + 実機 iPhone 6 + iOS 9.2
サンプルコードを動かすためにやること概要
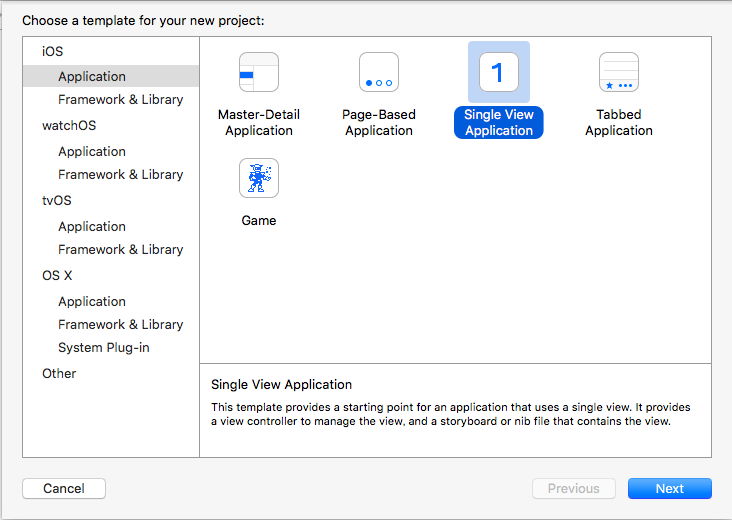
- Xcode で新規に Single View Application のプロジェクトを作成
- PostViewController.swift を作成
- AppDelegate.swift (ライフサイクル管理のコード) にサンプルコードをコピペ
- ViewController.swift (最初の画面のコード) にサンプルコードをコピペ
- PostViewController.swift (ツイート投稿画面のコード) にサンプルコードをコピペ
プロジェクト作成と PostViewController.swift の作成
Xcode で新規に Single View Application のプロジェクトを作成して、
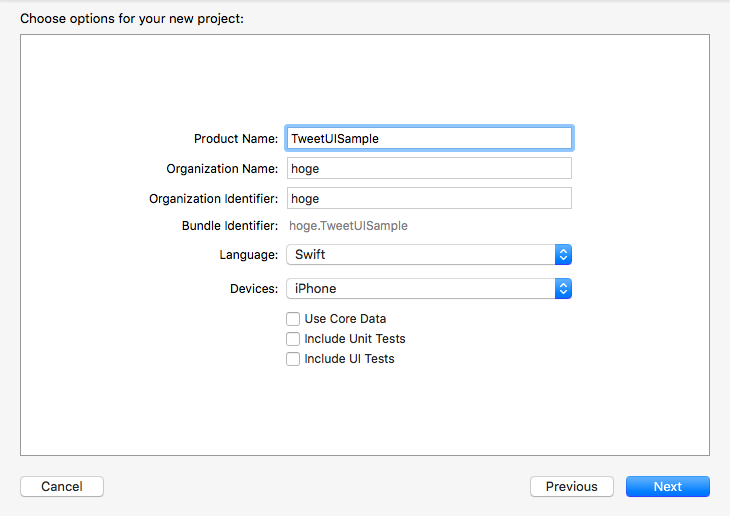
Project Name などは任意のものでOK.
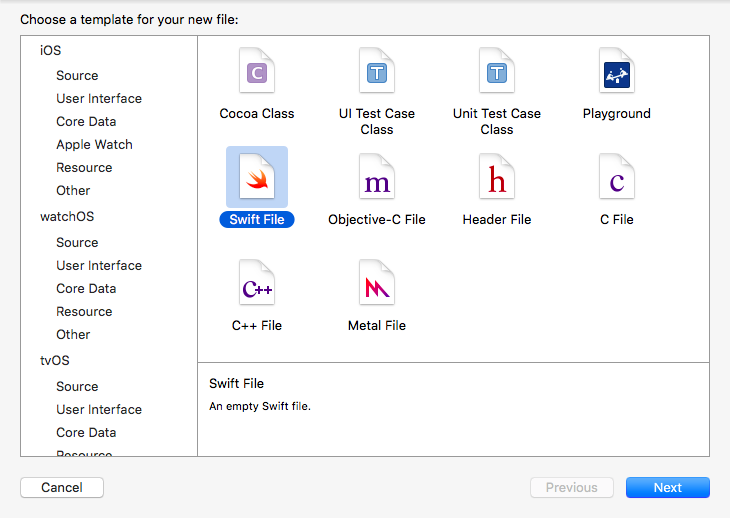
Xcode のメニューから [File] → [New] → [File...] → [iOS] → [Source] → [Swift File] にて、「PostViewController.swift」というファイル名で Swift のファイルを追加する。
AppDelegate.swift のコード
AppDelegate.swift はアプリのライフサイクルを管理するコード。
以下のコードを AppDelegate.swift に上書きコピペ。
//
//  AppDelegate.swift
//

import UIKit

@UIApplicationMain
class AppDelegate: UIResponder, UIApplicationDelegate {

    var window: UIWindow?

    // ナビゲーションコントローラー
    private var myNavigationController: UINavigationController?

    func application(application: UIApplication, didFinishLaunchingWithOptions launchOptions: [NSObject: AnyObject]?) -> Bool {

        // 1つめのビューコントローラ―をセットする
        let viewController = ViewController()
        self.myNavigationController = UINavigationController(rootViewController: viewController)
        self.window = UIWindow(frame: UIScreen.mainScreen().bounds)
        self.window?.rootViewController = myNavigationController
        self.window?.makeKeyAndVisible()

        return true
    }

    func applicationWillResignActive(application: UIApplication) {
        // Sent when the application is about to move from active to inactive state. This can occur for certain types of temporary interruptions (such as an incoming phone call or SMS message) or when the user quits the application and it begins the transition to the background state.
        // Use this method to pause ongoing tasks, disable timers, and throttle down OpenGL ES frame rates. Games should use this method to pause the game.
    }

    func applicationDidEnterBackground(application: UIApplication) {
        // Use this method to release shared resources, save user data, invalidate timers, and store enough application state information to restore your application to its current state in case it is terminated later.
        // If your application supports background execution, this method is called instead of applicationWillTerminate: when the user quits.
    }

    func applicationWillEnterForeground(application: UIApplication) {
        // Called as part of the transition from the background to the inactive state; here you can undo many of the changes made on entering the background.
    }

    func applicationDidBecomeActive(application: UIApplication) {
        // Restart any tasks that were paused (or not yet started) while the application was inactive. If the application was previously in the background, optionally refresh the user interface.
    }

    func applicationWillTerminate(application: UIApplication) {
        // Called when the application is about to terminate. Save data if appropriate. See also applicationDidEnterBackground:.
    }
}
ViewController.swift のコード
ViewController.swift にはアプリ起動後、最初に表示される画面の処理が書かれている。
以下のコードを ViewController.swift に上書きコピペ。
//
//  ViewController.swift
//

import UIKit

// 1つめの画面
class ViewController: UIViewController {

    // 画面の初期化
    override func viewDidLoad() {

        super.viewDidLoad()

        // タイトルを設定
        self.title = "First View"

        // 背景色を設定
        self.view.backgroundColor = UIColor.cyanColor()

        // ツイート投稿画面へ遷移するボタン
        let button = UIButton(frame: CGRectMake(0, 0, 200, 50))
        button.backgroundColor = UIColor.orangeColor()
        button.layer.masksToBounds = true
        button.setTitle("ツイート画面へ", forState: .Normal)
        button.layer.cornerRadius = 20.0
        button.layer.position = CGPoint(x: self.view.bounds.width / 2, y:200)
        button.addTarget(self, action: "onTapButton:", forControlEvents: .TouchUpInside)
        self.view.addSubview(button);
    }

    func onTapButton(sender: UIButton){

        // ツイート投稿画面へ遷移
        self.navigationController?.pushViewController(PostViewController(), animated: true)
    }

    override func didReceiveMemoryWarning() {

        super.didReceiveMemoryWarning()
    }
}
PostViewController.swift のコード
PostViewController.swift はツイート投稿画面のソースコード。
ツイート画面のメインとなる部分 (テキスト入力部分とメニューバー) は、 iOS の機能である Auto Layout の 制約 (Constraint) を利用して、UI 部品を配置している。
以下のコードを PostViewController.swift に上書きコピペ。
//
//  PostViewController.swift
//

import UIKit

// ツイート投稿画面
class PostViewController: UIViewController {

    // ツイート用ビュー全体
    private var myTweetView: UIView?

    // ツイート用ビュー内: メニューバー
    private var myMenubar: UIToolbar?

    // ツイート用ビュー内: テキストビュー (テキスト入力部分)
    private var myTextView: UITextView?

    // ツイート用ビュー内: 入力可能な残り文字数を表示するためのラベル
    private var myCountLabel: UILabel?

    // 画面の初期化
    override func viewDidLoad() {

        super.viewDidLoad()

        self.view.removeConstraints(self.view.constraints)

        self.view.backgroundColor = UIColor.whiteColor()

        // ナビゲーションバーを構築
        PostViewController.buildNavigationBar(self)

        // ステータスバー (一番上の時刻、Wi-Fi、充電状況が表示されるエリア) の高さ
        let statusBarHeight = UIApplication.sharedApplication().statusBarFrame.height

        // ナビゲーションバーの高さ
        let navigationBarHeight = self.navigationController!.navigationBar.frame.height

        // 画面全体のサイズ
        let viewWidth = self.view.frame.width
        let viewHeight = self.view.frame.height

        // ツイート用ビューの高さ
        let tweetViewHeight = viewHeight - statusBarHeight - navigationBarHeight

        // ツイート用ビューを生成
        self.myTweetView = UIView(frame: CGRectMake(0, statusBarHeight + navigationBarHeight, viewWidth, tweetViewHeight))
        self.myTweetView!.backgroundColor = UIColor.cyanColor()
        self.view.addSubview(self.myTweetView!)

        // ツイート用ビューの中に配置するメニューバーを生成
        (self.myMenubar, self.myCountLabel) = PostViewController.createMenubar(self, tweetView: self.myTweetView!)
        self.myTweetView!.addSubview(self.myMenubar!)

        // ツイート用ビューの中に配置するテキストビューを生成
        self.myTextView = PostViewController.createTextView(self, tweetView: self.myTweetView!)
        self.myTweetView!.addSubview(self.myTextView!)

        // 入力可能な残り文字数をラベルに表示
        PostViewController.updateCountLabel(self.myCountLabel!, textView: self.myTextView!)

        // ツイート用ビューの中に要素を配置する
        PostViewController.layoutTweetView(self.myTweetView!, tweetView: self.myTweetView!, menubar: self.myMenubar!, textView: self.myTextView!)

        // キーボード表示・非表示時などのサイズ変更時に通知
        NSNotificationCenter.defaultCenter().addObserver(self, selector: "onKeyboardWillChangeFrame:", name: UIKeyboardWillChangeFrameNotification, object: nil)

        // テキストビューのテキストの変更時に通知
        NSNotificationCenter.defaultCenter().addObserver(self, selector: "onTextViewTextDidChange:", name: UITextViewTextDidChangeNotification, object: nil)

        // テキストビューにフォーカスを当てて、キーボードを表示する
        self.myTextView!.becomeFirstResponder()
    }

    // ナビゲーションバーを構築
    private static func buildNavigationBar(viewController: UIViewController) -> Void {

        // ナビゲーションバーのタイトル
        viewController.navigationItem.titleView = PostViewController.createNavigationBarTitleView()

        // ナビゲーションバーに閉じるボタンを追加
        let closeButton = UIBarButtonItem(title: "Close", style: .Plain, target: viewController, action: "onTapCloseButton:")
        viewController.navigationItem.leftBarButtonItem = closeButton

        // ナビゲーションバーにツイートボタンを追加
        let tweetButton = UIBarButtonItem(title: "Tweet", style: .Plain, target: viewController, action: "onTapTweetButton:")
        viewController.navigationItem.rightBarButtonItem = tweetButton
    }

    // ナビゲーションバーのタイトル (縦に2列) を生成
    private static func createNavigationBarTitleView() -> UIView {

        let view = UIView(frame: CGRectMake(0, 0, 100, 40))

        let title = UILabel(frame: CGRectMake(0, 0, 100, 20))
        title.text = "New Tweet"
        view.addSubview(title)

        let subtitle = UILabel(frame: CGRectMake(0, 20, 100, 20))
        subtitle.text = "@123456789012345"
        subtitle.lineBreakMode = .ByTruncatingTail // 長いテキストの場合は末尾を「…」で省略表示
        view.addSubview(subtitle)

        return view
    }

    // メニューバーを生成
    private static func createMenubar(viewController: UIViewController, tweetView: UIView) -> (UIToolbar?, UILabel?) {

        // メニューバーをツールバーで実装していく

        // テキストボタン
        let textButtonItem = UIBarButtonItem(title: "Text", style: .Plain, target: viewController, action: "onTapTextButton:")

        // アイコンボタン
        let iconButtonItem = UIBarButtonItem(barButtonSystemItem: UIBarButtonSystemItem.Camera, target: viewController, action: "onTapIconButton:")

        // カスタムボタン
        let customButton = UIButton(type: UIButtonType.System)
        customButton.setTitle("Custom", forState: .Normal)
        customButton.frame = CGRectMake(0, 0, 100, 40)
        customButton.layer.borderWidth = 1
        customButton.setTitleColor(UIColor.redColor(), forState: .Normal)
        customButton.addTarget(viewController, action: "onTapCustomButton:", forControlEvents: .TouchUpInside)
        let customButtonItem = UIBarButtonItem(customView: customButton)

        // ボタンを左右に配置するためのスペーサー
        let flexibleItem = UIBarButtonItem(barButtonSystemItem: UIBarButtonSystemItem.FlexibleSpace, target: nil, action: nil)

        // 入力可能な残り文字数を表示するためのラベル
        let countLabel = UILabel(frame: CGRectMake(0, 0, 40, 40))
        countLabel.text = "140"
        countLabel.textAlignment = .Right
        let countLabelItem = UIBarButtonItem(customView: countLabel)

        // ツールバーに要素を配置
        let toolbar = UIToolbar()
        toolbar.items = [textButtonItem, iconButtonItem, customButtonItem, flexibleItem, countLabelItem]
        tweetView.addSubview(toolbar)

        return (toolbar, countLabel)
    }

    // テキストビューを生成
    private static func createTextView(viewController: UIViewController, tweetView: UIView) -> UITextView {

        // テキストビュー
        let textView = UITextView()
        textView.backgroundColor = UIColor.greenColor()
        textView.layer.borderWidth = 1
        textView.layer.borderColor = UIColor.blackColor().CGColor
        textView.text = "UITextView"

        return textView
    }

    // ツイート用ビューにメニューバーとテキストビューを配置
    private static func layoutTweetView(view: UIView, tweetView: UIView, menubar: UIView, textView: UIView) -> Void {

        // メニューバー
        let menubarHeight = CGFloat(44.0) // メニューバーの高さ
        menubar.translatesAutoresizingMaskIntoConstraints = false
        view.addConstraint(NSLayoutConstraint(item: menubar, attribute: .Top,    relatedBy: .Equal, toItem: tweetView, attribute: .Bottom, multiplier: 1, constant: -menubarHeight))
        view.addConstraint(NSLayoutConstraint(item: menubar, attribute: .Bottom, relatedBy: .Equal, toItem: tweetView, attribute: .Bottom, multiplier: 1, constant: 0))
        view.addConstraint(NSLayoutConstraint(item: menubar, attribute: .Left,   relatedBy: .Equal, toItem: tweetView, attribute: .Left,   multiplier: 1, constant: 0))
        view.addConstraint(NSLayoutConstraint(item: menubar, attribute: .Right,  relatedBy: .Equal, toItem: tweetView, attribute: .Right,  multiplier: 1, constant: 0))

        // テキストビュー
        textView.translatesAutoresizingMaskIntoConstraints = false
        view.addConstraint(NSLayoutConstraint(item: textView, attribute: .Top,    relatedBy: .Equal, toItem: tweetView, attribute: .Top,    multiplier: 1, constant: 0))
        view.addConstraint(NSLayoutConstraint(item: textView, attribute: .Bottom, relatedBy: .Equal, toItem: menubar,   attribute: .Top,    multiplier: 1, constant: 0)) // メニューバーの上に設置
        view.addConstraint(NSLayoutConstraint(item: textView, attribute: .Left,   relatedBy: .Equal, toItem: tweetView, attribute: .Left,   multiplier: 1, constant: 0))
        view.addConstraint(NSLayoutConstraint(item: textView, attribute: .Right,  relatedBy: .Equal, toItem: tweetView, attribute: .Right,  multiplier: 1, constant: 0))
    }

    // キーボード表示・非表示時などのサイズ変更時
    func onKeyboardWillChangeFrame(notification: NSNotification?) {

        if let userInfo = notification!.userInfo {
            if let keyboard = userInfo[UIKeyboardFrameEndUserInfoKey] as? NSValue {
                resizeTweetView(keyboard.CGRectValue())
            }
        }
    }

    // メニューバーのボタンをタップしたとき
    func resizeTweetView(keyBoardRect: CGRect) {

        let myStatusBarHeight = UIApplication.sharedApplication().statusBarFrame.height
        let myNavigationBarHeight = self.navigationController!.navigationBar.frame.height
        let myViewWidth = self.view.frame.width
        let myViewHeight = self.view.frame.height
        let myTweetViewHeight = myViewHeight - myStatusBarHeight - myNavigationBarHeight - keyBoardRect.height
        self.myTweetView?.frame = CGRectMake(0, myStatusBarHeight + myNavigationBarHeight, myViewWidth, myTweetViewHeight)
    }

    // テキストビューのテキストの変更時
    func onTextViewTextDidChange(notification: NSNotification?) {

        if let textView = notification!.object as? UITextView {
            PostViewController.updateCountLabel(self.myCountLabel!, textView: textView)
        }
    }

    // 入力可能な残り文字数をラベルに表示
    private static func updateCountLabel(countLabel: UILabel, textView: UITextView) {

        let count = PostViewController.getCount(textView.text)
        countLabel.text = String(count)
        if count < 0 {
            // 残り文字数が負の数のときは赤色の文字にする
            countLabel.textColor = UIColor.redColor()
        } else {
            countLabel.textColor = UIColor.blackColor()
        }
    }

    // 入力可能な残り文字数を返す
    private static func getCount(text: String) -> Int {

        // ツイート内にあるURLは短縮されるのでここで算出する必要がある
        return 140 - text.characters.count
    }

    // 閉じるボタンをタップしたとき
    func onTapCloseButton(sender: UIButton) {
        // 現在の画面から離脱
        self.navigationController!.popViewControllerAnimated(true)
    }

    // ツイートボタンをタップしたとき
    func onTapTweetButton(sender: UIButton) {

        PostViewController.showAlertDialog(self, title: "Tweet", message: myTextView!.text)
    }

    // メニューバーのボタンをタップしたとき
    func onTapTextButton(sender: UIBarButtonItem) {

        PostViewController.showAlertDialog(self, title: "Text", message: "Text")
    }

    // メニューバーのボタンをタップしたとき
    func onTapIconButton(sender: UIBarButtonItem) {

        PostViewController.showAlertDialog(self, title: "Icon", message: "Icon")
    }

    // メニューバーのボタンをタップしたとき
    func onTapCustomButton(sender: UIBarButtonItem) {

        PostViewController.showAlertDialog(self, title: "Custom", message: "Custom")
    }

    // アラートダイアログを表示する
    private static func showAlertDialog(view: UIViewController, title: String, message: String) {

        let alert = UIAlertController(title: title, message: message, preferredStyle: .Alert)
        alert.addAction(UIAlertAction(title: "OK", style: .Default, handler: nil))
        dispatch_async(dispatch_get_main_queue(), {
            view.presentViewController(alert, animated: true, completion: nil)
        })
    }

    override func didReceiveMemoryWarning() {

        super.didReceiveMemoryWarning()
    }
}
サンプルコードを実行した結果
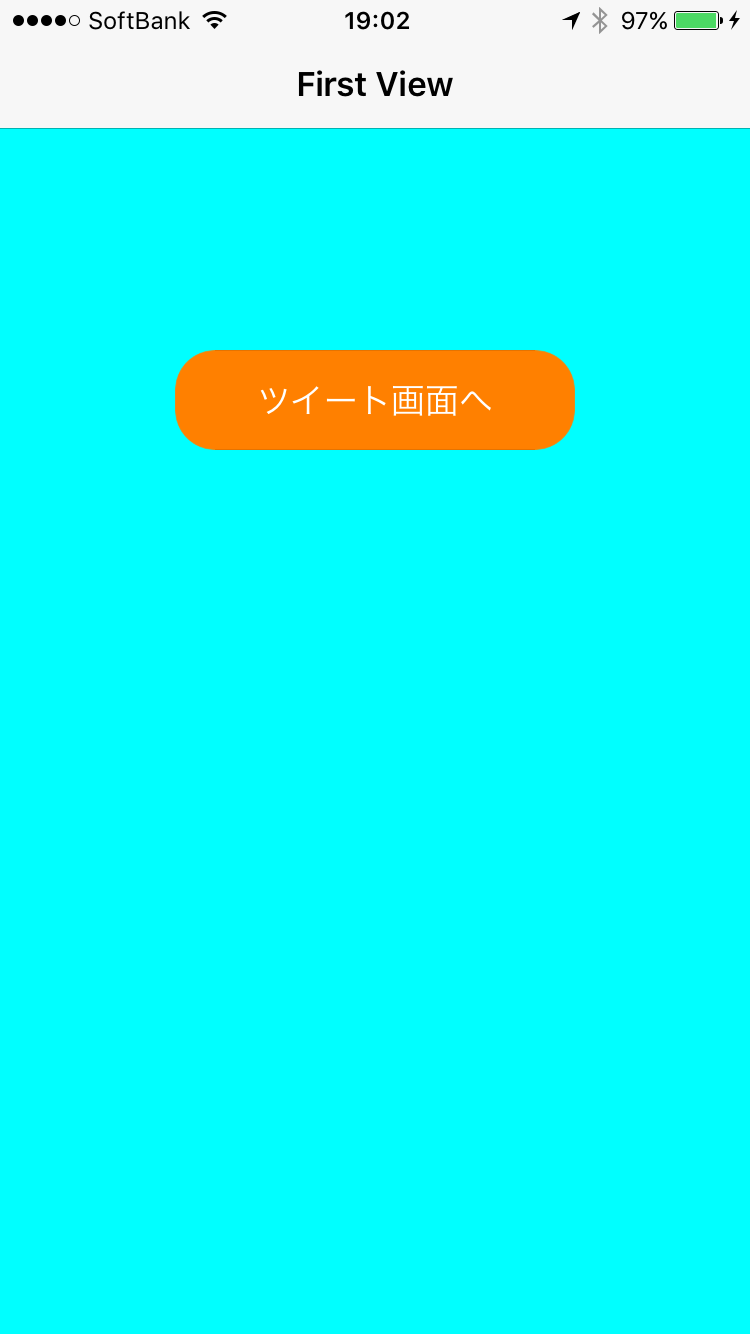
最初の画面。
ツイート投稿画面。

参考資料
参考になった資料がたくさんありすぎて (そしておぼえていなくて) まとめるのたいへんなのであきらめ。
役に立った書籍を3冊だけ挙げておく (1冊だけでは足りなかったし、本だけでは解決できない部分もあったけど、コードの中身を理解するにはこのへんの書籍が非常に参考になった)。
基本に忠実だから安心。長く使える定番教科書。Swift言語によるiOSアプリケーションの開発手順を基礎からしっかり学べます。
Amazon.co.jp: TECHNICAL MASTERはじめてのiOSアプリ開発Swift対応版: 長谷川 智希, デジタルサーカス: 本
第1部ではUI設計の考え方を、第2部では実際のプログラミング手順を、そして第3部では、UIをさらに楽しくする便利なTipsを多数解説しました。すべて新言語であるSwiftをベースに解説していますから、Swiftの入門書としても活用できます。「UI設計の基本を知りたい」「Swiftによるプログラミングを学びたい」「UIに凝ったアプリを作りたい」……そんなあらゆるニーズに対応したお得な1冊です。
Amazon.co.jp: SwiftではじめるUI設計&プログラミング 「操作性」と「デザイン性」を兼ね備えたアプリの開発手法: 柴田 文彦: 本
UIKitの機能の中から使用頻度の高いものをピックアップし、それを実現するためのクラスやメソッドを詳細に解説するとともに、機能が実感できるサンプルプログラムを掲載していきます。
Amazon.co.jp: UIKit&Swiftプログラミング 優れたiPhoneアプリ開発のための UI実装ガイド: 斉藤 祐輔 JIBUNSTYLE Inc.: 本
# ここまでコードを書いて、ようやく iOS + Swift の基本的なことがわかってきた気がする。
# アプリリリースまでの道のりが長い。。。
↓これまでに書いた iOS + Swift のサンプルコード。
- [ヅ] Swift で Twitter 投稿するサンプルコード (Storyboard を使わないお手軽コピペ版) (2015-11-17)
- [ヅ] Swift で位置情報付きの Twitter 投稿するサンプルコード (Storyboard を使わないお手軽コピペ版) (2015-12-09)
- [ヅ] Swift + MapKit で地図アプリの基本的な処理をするサンプルコード (2015-12-15)
- [ヅ] Swift + MapKit で長押しした際に地図にピンを降らせるアニメーション (2015-12-20)
tags: iphone twitter swift
Posted by NI-Lab. (@nilab)


