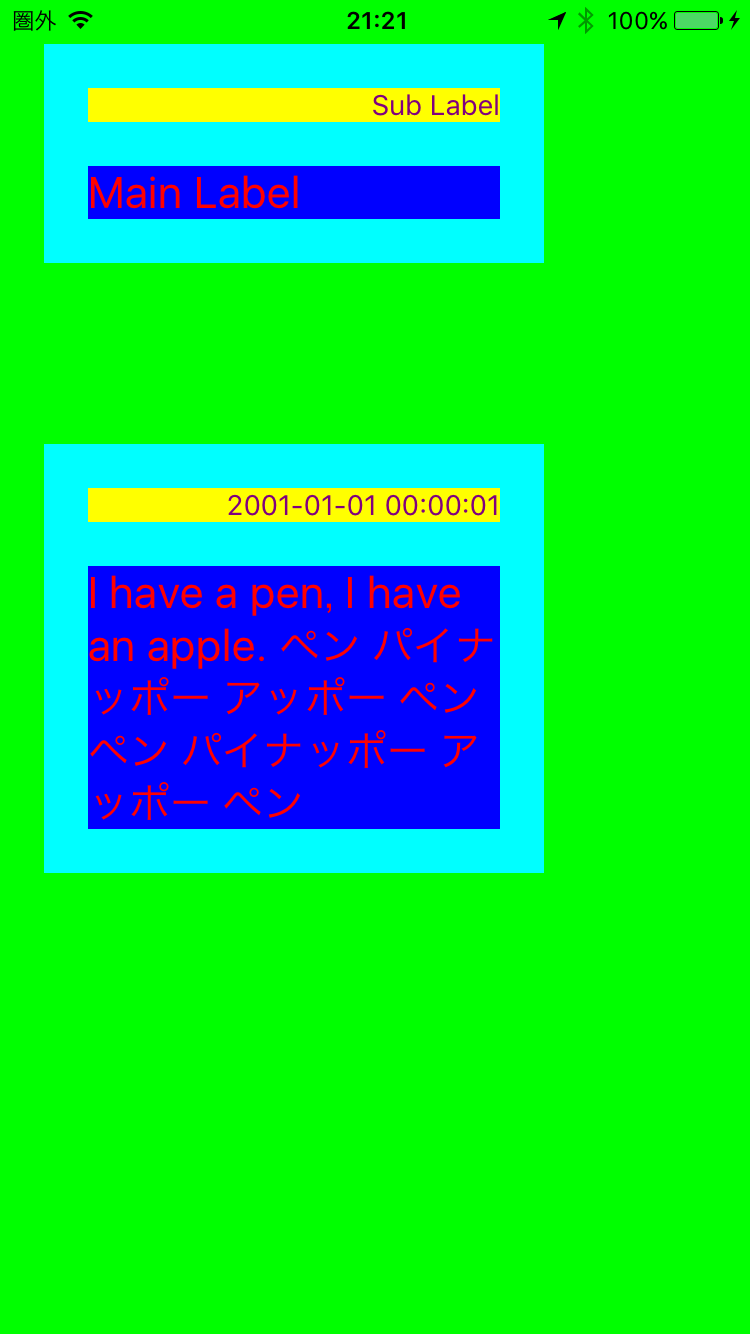
iPhone 6 実機にて、実行結果の画面。

Xcode で新規に Single View Application のプロジェクトを作成して、以下のサンプルコードを ViewController.swift に貼り付ければ完成。
//
//  ViewController.swift
//

import UIKit

class ViewController: UIViewController {

  override func viewDidLoad() {

    super.viewDidLoad()

    self.view.backgroundColor = .green

    _ = ViewController.addContentView(view: self.view, x: 22, y: 22, width: 250, mainLabel: "Main Label", subLabel: "Sub Label")
    _ = ViewController.addContentView(view: self.view, x: 22, y: 222, width: 250, mainLabel: "I have a pen, I have an apple. ペン パイナッポー アッポー ペン ペン パイナッポー アッポー ペン", subLabel: "2001-01-01 00:00:01")
  }

  private static func addContentView(view: UIView, x: CGFloat, y: CGFloat, width: CGFloat, mainLabel: String, subLabel: String) -> UIView {
    let frameView = ViewController.addFrameView(parentView: view, x: x, y: y, width: width)
    let subLabel = ViewController.addSubLabel(frameView: frameView, text: subLabel)
    _ = ViewController.addMainLabel(frameView: frameView, subLabel: subLabel, text: mainLabel)
    return frameView
  }

  private static func addFrameView(parentView: UIView, x: CGFloat, y: CGFloat, width: CGFloat) -> UIView {

    // ビューを生成
    let frameView = UIView()
    frameView.backgroundColor = .cyan

    // Autosizing を constraints に適用しない
    frameView.translatesAutoresizingMaskIntoConstraints = false
    parentView.addSubview(frameView);

    // constraints を設定
    parentView.addConstraints([

      // X座標: x
      NSLayoutConstraint(
        item: frameView,
        attribute: .left,
        relatedBy: .equal,
        toItem: parentView,
        attribute: .left,
        multiplier: 1.0,
        constant: x),

      // Y座標: y
      NSLayoutConstraint(
        item: frameView,
        attribute: .top,
        relatedBy: .equal,
        toItem: parentView,
        attribute: .top,
        multiplier: 1.0,
        constant: y),

      // 横幅: width
      NSLayoutConstraint(
        item: frameView,
        attribute: .width,
        relatedBy: .equal,
        toItem: nil,
        attribute: .width,
        multiplier: 1.0,
        constant: width),
    ])

    return frameView
  }

  private static func addSubLabel(frameView: UIView, text: String) -> UILabel {

    // ラベルを生成
    let subLabel = UILabel()
    subLabel.text = text
    subLabel.textAlignment = .right
    subLabel.font = UIFont.systemFont(ofSize: 14)
    subLabel.textColor = .purple
    subLabel.backgroundColor = .yellow

    // Autosizing を constraints に適用しない
    subLabel.translatesAutoresizingMaskIntoConstraints = false
    frameView.addSubview(subLabel);

    // constraints を設定
    frameView.addConstraints([

      // 上端: 22ポイント空ける
      NSLayoutConstraint(
        item: subLabel,
        attribute: .top,
        relatedBy: .equal,
        toItem: frameView,
        attribute: .top,
        multiplier: 1.0,
        constant: 22),

      // 左端: 22ポイント空ける
      NSLayoutConstraint(
        item: subLabel,
        attribute: .left,
        relatedBy: .equal,
        toItem: frameView,
        attribute: .left,
        multiplier: 1.0,
        constant: 22),

      // 右端: 22ポイント空ける
      NSLayoutConstraint(
        item: subLabel,
        attribute: .right,
        relatedBy: .equal,
        toItem: frameView,
        attribute: .right,
        multiplier: 1.0,
        constant: -22),
    ])

    return subLabel
  }

  private static func addMainLabel(frameView: UIView, subLabel: UIView, text: String) -> UILabel {

    // ラベルを生成
    let mainLabel = UILabel()
    mainLabel.text = text
    mainLabel.textAlignment = .left
    mainLabel.font = UIFont.systemFont(ofSize: 22)
    mainLabel.numberOfLines = 0
    mainLabel.textColor = .red
    mainLabel.backgroundColor = .blue

    // Autosizing を constraints に適用しない
    mainLabel.translatesAutoresizingMaskIntoConstraints = false
    frameView.addSubview(mainLabel);

    // constraints を設定
    frameView.addConstraints([

      // 上端: 22ポイント空ける
      NSLayoutConstraint(
        item: mainLabel,
        attribute: .top,
        relatedBy: .equal,
        toItem: subLabel,
        attribute: .bottom,
        multiplier: 1.0,
        constant: 22),

      // 左端: 22ポイント空ける
      NSLayoutConstraint(
        item: mainLabel,
        attribute: .left,
        relatedBy: .equal,
        toItem: frameView,
        attribute: .left,
        multiplier: 1.0,
        constant: 22),

      // 右端: 22ポイント空ける
      NSLayoutConstraint(
        item: mainLabel,
        attribute: .right,
        relatedBy: .equal,
        toItem: frameView,
        attribute: .right,
        multiplier: 1.0,
        constant: -22),

      // 下端: 22ポイント空ける
       NSLayoutConstraint(
        item: mainLabel,
        attribute: .bottom,
        relatedBy: .equal,
        toItem: frameView,
        attribute: .bottom,
        multiplier: 1.0,
        constant: -22),
    ])

    return mainLabel
  }

  override func didReceiveMemoryWarning() {
    super.didReceiveMemoryWarning()
    // Dispose of any resources that can be recreated.
  }
}
今回の環境は Xcode Version 8.1 + Apple Swift version 3.0.1
- ref.
- [ヅ] Swift コードだけで実現する Auto Layout constraint 制約サンプル (ラベルを中心に表示するだけ) (2016-11-10)
- Auto Layoutをコードから使おう
- init(item:attribute:relatedBy:toItem:attribute:multiplier:constant:) - NSLayoutConstraint | Apple Developer Documentation
- Auto Layout (AutoLayout - MemoWiki)
tags: swift iphone ios
Posted by NI-Lab. (@nilab)


