KMLファイルを読み込んだり生成したりできるライブラリJAK(Java API for KML)を使ってみた。
JAK(Java API for KML)を入手する
JAKの公式サイト。
-JAK Home
-javaapiforkml - Project Hosting on Google Code
Downloads - javaapiforkml - Project Hosting on Google Code から JavaAPIforKml.jar (091130版)をダウンロードして、クラスパスに通す。
JAXBを入手する
JAKのFAQを見るとJAXB 2.1以降が必要と書いてある。
NoClassDefFoundError?
JAK only works if all dependencies are resolved! This is mainly JAXB! JAXB needed to be downloaded and the containing JARs put into the classpath.
Version 2.1.xx of JAXB should be fine.
After downloading JAXB 2.1.xx (or a later version) the jar needed to be executed with this command: java -jar JAXB2_200xxxxx.jar
or on Windows or Mac, a double-click on the jar file will execute it.
In the next step accept the license contract (if you agree) and take a look in the jaxb-ri-200xxxxx/bin folder. From there copy these files to you own lib folder in your JAK project:
* activation.jar
* jaxb-api.jar
* jaxb-impl.jar
* jsr173_1.0_api
* (optional: the jaxb-xjc.jar, if you like to use the XJCPluginJavaApiforKml as well)
JAK FAQ
JAXBの公式サイト。
-jaxb: JAXB Reference Implementation
今回は JAXB RI 2.2 にある JAXB2_20091104.jar をダウンロードして、
C:jaxb>java -version
java version "1.6.0_17"
Java(TM) SE Runtime Environment (build 1.6.0_17-b04)
Java HotSpot(TM) Client VM (build 14.3-b01, mixed mode, sharing)

C:jaxb>java -jar JAXB2_20091104.jar
という感じで解凍する。
(なんで普通にzpi圧縮とかじゃないんだろう? わかりにくい……)
activation.jar, jaxb-api.jar, jaxb-impl.jar, jsr173_1.0_api の4ファイルをクラスパスに通す。
KMLを生成するサンプル
サンプルコードを書いてみた。
import java.io.*;
import de.micromata.opengis.kml.v_2_2_0.*;

public class Sample {

  public static void main(String[] args) throws FileNotFoundException {

    Kml kml = KmlFactory.createKml();
    Document d =
      kml.createAndSetDocument()
        .withName("お城")
        .withDescription("日本のお城を集めてみました。");

    // ひとつめのPOI
    Placemark p1 =
      d.createAndAddPlacemark()
        .withName("彦根城")
        .withDescription("女子向けに『ひこにゃんパンツ』とか売ってたりするらしいよ!だれか穿いて見せ(ry<br /><img src=\"20100108_1.jpg\">");
    p1.createAndSetPoint().addToCoordinates(136.251845, 35.276994); // (経度,緯度)
    // アイコンを指定
    p1.createAndAddStyle().createAndSetIconStyle().
      withScale(1.0).createAndSetIcon().withHref("20100108_1.jpg");

    // ふたつめのPOI
    Placemark p2 =
      d.createAndAddPlacemark()
        .withName("名古屋城")
        .withDescription("なごやじょうだがやー。みゃー。<br /><img src=\"20100108_2.png\">");
    p2.createAndSetPoint().addToCoordinates(136.899408, 35.185085); // (経度,緯度)
    // アイコンを指定
    p2.createAndAddStyle().createAndSetIconStyle()
      .withScale(1.0).createAndSetIcon().withHref("20100108_2.png");

    // KMLファイルを出力
    kml.marshal(new File("20100108_castles.kml")); // 引数にOutputStreamを指定できたりもする
  }

}
サンプルコードが出力したKMLファイル
<?xml version="1.0" encoding="UTF-8" standalone="yes"?>
<kml xmlns="http://www.opengis.net/kml/2.2" xmlns:gx="http://www.google.com/kml/ext/2.2" xmlns:atom="http://www.w3.org/2005/Atom" xmlns:xal="urn:oasis:names:tc:ciq:xsdschema:xAL:2.0">
<Document>
<name>お城</name>
<description>日本のお城を集めてみました。</description>
<Placemark>
<name>彦根城</name>
<description>女子向けに『ひこにゃんパンツ』とか売ってたりするらしいよ!だれか穿いて見せ(ry<br /><img src="20100108_1.jpg"></description>
<Style>
<IconStyle>
<scale>1.0</scale>
<heading>0.0</heading>
<Icon>
<href>20100108_1.jpg</href>
<refreshInterval>0.0</refreshInterval>
<viewRefreshTime>0.0</viewRefreshTime>
<viewBoundScale>0.0</viewBoundScale>
</Icon>
</IconStyle>
</Style>
<Point>
<coordinates>136.251845,35.276994</coordinates>
</Point>
</Placemark>
<Placemark>
<name>名古屋城</name>
<description>なごやじょうだがやー。みゃー。<br /><img src="20100108_2.png"></description>
<Style>
<IconStyle>
<scale>1.0</scale>
<heading>0.0</heading>
<Icon>
<href>20100108_2.png</href>
<refreshInterval>0.0</refreshInterval>
<viewRefreshTime>0.0</viewRefreshTime>
<viewBoundScale>0.0</viewBoundScale>
</Icon>
</IconStyle>
</Style>
<Point>
<coordinates>136.899408,35.185085</coordinates>
</Point>
</Placemark>
</Document>
</kml>
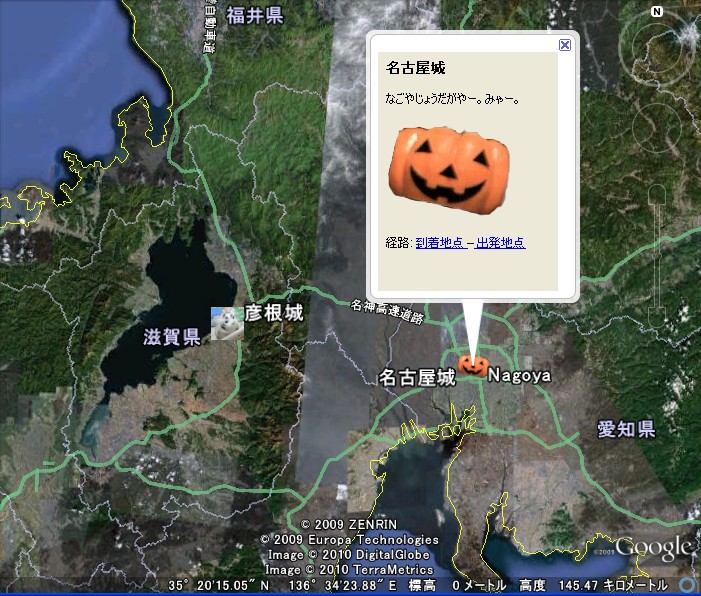
出力したKMLファイルをGoogle Earthで見てみるとこんな感じ。

実際に出力されたKMLファイル: 20100108_castles.kml
このKMLファイルをGoogle Earthで見ても画像は表示されない。相対パスで指定してるから。
ブラウザから直接起動したとしてもGoogle Earthにとってはローカルにダウンロードしたファイルだから。。。
残念ながら Google Maps でもダメらしい。URLを直接指定してるんだから画像ファイルの場所はわかるはずだし画像を表示してくれても良さそうなもんなのになぁ。。。
サンプルで使った画像ファイル:
-20100108_1.jpg
-20100108_2.png
tags: zlashdot Java GoogleEarth Java KML
Posted by NI-Lab. (@nilab)


