
発端
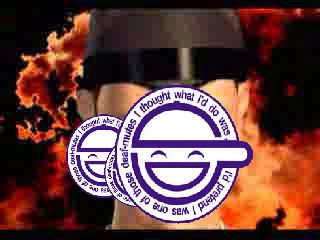
The Laughing Man Hacks You! とか 攻殻機動隊ネタ - 笑い男摸倣ツール Catcher in the Rye とか 「顔面認識→笑い男貼り付け」ツールを Ruby で書く - にっき (2007-03-12) とか見てたら顔認識プログラムを作ってみたくなった。Javaで。
顔認識といえば、いま一番あついのは Open Source Computer Vision Library(OpenCV Library) だと思うけど、C/C++で書かれているっぽいので、ちょっと使いづらい。
Perl や Ruby では OpenCV をコールする顔認識ライブラリを作っている人がいるみたいだけど、残念ながら Java では見当たらない。OpenCV + JNI(Java Native Interface) は大変そうだなぁ……
しょうがないので、別の道で。
BlobDetection で物体認識
BlobDetection library / v3ga というカタマリ認識をする Java のライブラリを発見したのでこれを使用。どうやら Java のためのライブラリというより Processing (Proce55ing) 用らしい。
肌色認識
BlobDetection だけだと画像の中のカタマリを何でも拾っちゃうので、顔を認識する方法が必要。
顔の位置を検出する方法として最も簡単なのが「肌色」を見つける方法です。
画素値を見て,それが肌色らしい色の範囲に入っていれば,それを肌色とみなします。 こうした色を使った領域抽出では,一般的にRGB色空間ではなく,YUV色空間やHSV色空間が使われます。 YUVやHSVは,色が持つ明るさの情報と,本質的な色味の情報を分離することができます。 これにより明るさの変化に強い色抽出が可能となるのです。
本ソフトではRGBをYUVに変換してから閾値処理によって肌色領域を抽出し, その領域の重心位置にマークを貼り付けています。
一方,色情報を用いない顔検出手法にHaar-like特徴を使った顔検出器があります。 これは顔のパーツ(目,鼻,口)の形状特徴に注目して「顔らしさ」の情報をデータベース化する手法です。 (OpenCVという画像処理ライブラリに入っています)
攻殻機動隊ネタ - 笑い男摸倣ツール Catcher in the Rye
というわけで、RGB表色系とYUV(というかYCrCb?)表色系を複合させて肌色判定をして、肌色部分を BlobDetection することにした。
表色系
表色系とは、色を表現するための体系。
RGB表色系とか、YCrCb表色系とか、CMY表色系とか。
YUV表色系への変換は YUVフォーマット及び YUVとRGBの変換 や C MAGAZINE 2003年5月号「画像処理を極めるアルゴリズムラボ 第44回 色の表現」を参考にしている。前者は思考&検証、後者はそれぞれの表色系についての解説と変換式がまとまって載っていて良い感じ。
雑誌記事って埋もれちゃうのがつらい。良い内容なのに、ウェブを検索しても見つからないし。
「画像処理を極めるアルゴリズムラボ」が書籍になってないか期待して Amazon.co.jp で探したけど著者の書籍は 昌達K’z 著 / 圧縮アルゴリズム―符号化の原理とC言語による実装 ぐらいしかみつからない。残念。
CS585 Assignment 1: Image and Video Computing - HW1: Face Detection
CS585 Assignment 1: Image and Video Computing - HW1: Face Detection (Benjamin Ring 03 FEB 2006) にあるコードが肌色認識の参考になった。It's great!
CS585 Homework Assignment 1: Face\ImageFunct.java には、
 54    //  findFace -- Identify all "flesh colored" pixels in an image
 55    //
 56    //       GIVEN: A BufferedImage
 57    //       EFFECT: Pass once through the entire image; For each pixel, invoke
 58    //                           the "isFlesh" function to conduct a simple color comparison
 59    //                           in order to determine if the given pixel is "flesh colored."
 60    //                           If it is, copy it to the new image; otherwise paint a black
 61    //                           pixel in its place.
 62    //           RETURN: Returns a black background image with the flesh colored pixels
 63    //                           copied from the original
 64    public static BufferedImage findFace (BufferedImage img)  {
 65            BufferedImage temp = new BufferedImage (img.getWidth(), img.getHeight(), BufferedImage.TYPE_INT_RGB);
 66            for (int x = 0; x < img.getWidth(); x++)  {
 67                    for (int y = 0; y < img.getHeight(); y++)  {
 68                            Color pixel = new Color(img.getRGB(x, y));
 69                            if (isFlesh(pixel))
 70                                    temp.setRGB(x, y, pixel.getRGB());
 71                            else
 72                                    temp.setRGB(x, y, Color.BLACK.getRGB());
 73                    }
 74            }
 75            return temp;
 76    }
 77
 78
 79
 80    //  isFlesh -- determine if a pixel is a "flesh colored" one
 81    //
 82    //       GIVEN: A 24-bit Color Object
 83    //       EFFECT:
 84    //                   1. First, the procedure filters out all colors whose red & green components
 85    //                           fail to fall above a certain thershold (Color value of 50);
 86    //                   2. Second, By plotting the Red & Green components of the Color Object as a vector
 87    //                           and subsequently comparing that Vector with two known Skin Tone Vectors,
 88    //                           denoted as Skin1 & Skin2, this prodecure uses the equation for
 89    //                           determining the Theta -- or angle -- between the two and measures to see
 90    //                           if that angle is nearly zero.
 91    //           NOTE:   In fact, it actually calculated COS(Theta) and check to see if it is close to 1.0
 92    //       RETURN: True if the Color Vector is similar to a skin-tone Vector,
 93    //                           False otherwise
 94    public static boolean isFlesh (Color col)  {
 95        Vect Skin1 = new Vect (225, 165);
 96        Vect Skin2 = new Vect (125, 50);
 97        Vect curColor = new Vect (col.getRed(), col.getGreen());
 98        if ((col.getRed() < 40) || (col.getGreen() < 40))
 99            return false;
100        else if ((Math.abs(Vect.Theta(curColor, Skin1)) > 0.995) ||
101            (Math.abs(Vect.Theta(curColor, Skin2)) > 0.995))
102              return true;
103        else  return false;
104    }
というコードがあり、
CS585 Homework Assignment 1: Face\Vect.java には、
 1 /*
 2  * Vect.java
 3  *
 4  * A simple Object Class to encapsulate Linear Algebra on Vector operations
 5  * This class supports both 2D and 3D vectors and computes magnitude, dot product
 6  * and the angle (represented as the COS(Theta))
 7  *
 8  * Created on September 21, 2005, 11:13 PM
 9  */
10
11 public class Vect {
12
13     public int x, y, z;
14
15     /** CONSTRUCTORS */
16     public Vect(int xComp, int yComp) {
17         x = xComp;
18         y = yComp;
19         z = 0;
20     }
21
22     public Vect(int xComp, int yComp, int zComp) {
23         x = xComp;
24         y = yComp;
25         z = zComp;
26     }
27
28     //Returns the Magnitude of the vector
29     public double magnitude()  {
30         return Math.sqrt(x*x + y*y + z*z);
31     }
32
33     //Static Method that returns the Dot Product of two Vectors
34     public static double dotProduct(Vect V1, Vect V2) {
35         return V1.x*V2.x + V1.y*V2.y + V1.z*V2.z;
36     }
37
38
39     //Static method to calculate the relationship between two vectors
40     //  based on the equation:
41     /*
42      *                                     V1 (dot-product) V2
43      *    COS (THETA) =   --------------------
44      *                         |V1| * |V2|
45      */
46     //  NOTE: this method actually returns the COS(Theta)
47     public static double Theta(Vect V1, Vect V2) {
48         return (dotProduct(V1, V2) / (V1.magnitude()*V2.magnitude()));
49     }
50
51 }
というコードがあり、これらは肌色判定をしている。
肌色以外は黒く塗りつぶすようになっている。
Interactive Face Recognition by Nishanth Vincent
Interactive Face Recognition : Nishanth Vincent に置いてある INTERACTIVE FACE RECOGNITION By Nishanth Vincent (Thesis 8/11/2006 (doc)) [Microsoft Word ファイル] がすごい。顔認識の方法について一通りの流れが書いてある。写真・数式・ソースコード付き。数式とソースコードが一致していないような気はしたけど。
この文書では、YIQ Color Model と YCbCr Color Model での顔抽出(Face Detection)の結果を比較して YCbCr のほうが良いと判断している。
また、白黒2値化したあとに erosion と dilation の画像処理をかけて比較している。dilation が良いらしい。
このあたりの画像処理アルゴリズムについては、Visual C++ 6.0を用いた易しい画像処理(14)-- 赤色を抽出し、拡張し収縮 -- の説明がわかりやすい。
Dilationのアルゴリズム
「注目するピクセルが0の場合、その周辺の8個のピクセルが1個でも1であれば注目するピクセルを1に変える」のがDilationであるが、これをこのまま使用すると、Dilationの効果が強すぎて、たちまち全画面が1になってしまう。そこで、ここでは、周辺ピクセルの1が5個(5/8であるから半数を超える)以上である時に注目するピクセルを1に変えることに緩和した。画像データの無い周辺部は、0であると仮定する。
Erosionのアルゴリズム
「注目するピクセルが1の場合、その周辺の8個のピクセルが1個でも0であれば注目するピクセルを0に変える」のがErosionであるが、これをこのまま使用すると、全画面が0になってしまうので、周辺ピクセルの1が3個(3/8であるから半数に満たない)以下である時に注目するピクセルを0に変えることに緩和した。画像データの無い周辺部は、1であると仮定する。
Visual C++ 6.0を用いた易しい画像処理(14)-- 赤色を抽出し、拡張し収縮 --
この文書では、dilation したあとは 前述した Java/Processing のためのライブラリ BlobDetection を使って Blob Detection している。
2004 年度 卒業研究 肌色抽出について 岡山理科大学 総合情報学部 情報科学科 澤見研究室 I01I013 犬飼芳久
2004 年度 卒業研究 肌色抽出について 岡山理科大学 総合情報学部 情報科学科 澤見研究室 I01I013 犬飼芳久 [PDFファイル] の文書にはいろいろな表色系による肌色抽出がまとまって載っている。この文書による結論は、
一般的な画像に対して肌色抽出を行う場合,色空間を利用するだけでは,肌色領域の分離は困難である.複数の色空間を併用したとしても,著しい抽出精度の向上は期待できない.一方,輪郭情報は,肌色抽出において大変有益なものであることがわかった.この輪郭情報を利用して肌色抽出を行う場合,輪郭情報の精度が肌色抽出の精度に直結するため,いかに輪郭情報を正確に取り出すかが重要である.今回,輪郭補償処理として8近傍と水平方向の輪郭補償を行っているが,近傍領域の拡張,斜め方向の輪郭補償など,輪郭補償処理を変更,改善することでさらなる抽出精度の向上が望めると思われる.
だそうな。
目次を見ただけでもすごそうな雰囲気。
2 色空間に注目した肌色抽出手法
2.1 肌色抽出の手法について
2.2 色空間について
2.2.1 RGB
2.2.2 XYZ
2.2.3 L*a*b*
2.2.4 YCbCr
2.2.5 YIQ
2.2.6 HSV
2.2.7 修正HSV
2.3 画素分布における検討
2.4 YCbCr を用いた肌色抽出
2.5 修正HSV を用いた肌色抽出
2.6 YCbCr と修正HSV を併用した肌色抽出
2.6.1 抽出処理の流れ
2.6.2 YCbCr と修正HSV を併用した肌色抽出結果
3 輪郭を利用した肌色抽出手法
3.1 輪郭抽出処理
3.1.1 Sobel フィルタ
3.1.2 肌色領域のノイズ軽減
3.1.3 輪郭補償処理
3.2 肌色領域着色,着色領域抽出
3.3 輪郭を利用した肌色抽出結果
この文書によると、YCbCrと修正HSVを併用するのが良いらしい。「肌色領域の誤った除去が目立つ結果となった」とも書いてあるけど。
肌色検出のコントロールパネル
前回まではカメラからのRGB入力をYUVにするマトリックスと、そのYUV画像の肌色の範囲の色が0x008080 (YYUUVV) になるようなマトリックスを併用していたので、これを単に合成してみたけど精度が下がる下がる。多分丸めに頼る部分があったんだと思う。
で、今回はそれを肌色の範囲が0x008080~0x00BFBFに収まるようなマトリックス一つに書き直した。BitmapData.thresholdの使い方も分かってきたので、2値化も大丈夫。
psyark.jp - 肌色検出のコントロールパネル
というわけで、この値も今回のプログラムの参考にしている。
値のチューニングは誰かが検証した値をベースにするのが良さそう。
検証用写真素材
制度を調査するにはいろいろな写真が必要。
クリエイティブ・コモンズ ライセンスな Flickr 内の写真を探索できる Improvisational Image Search (即興的画像検索) - Hunchz で Searching photos in CC license!
これは便利。
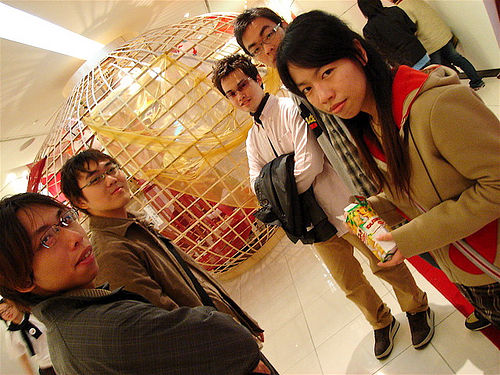
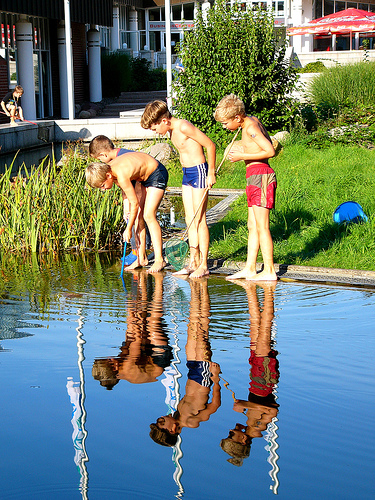
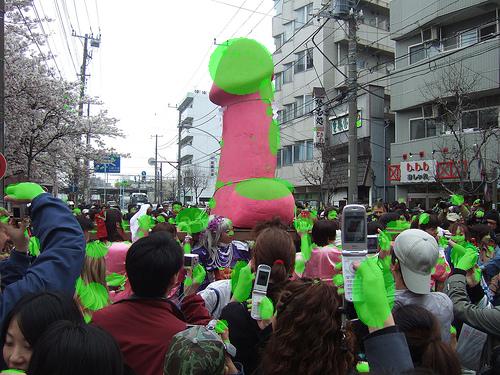
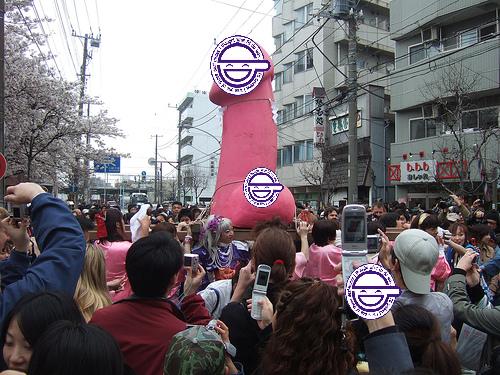
以下、いろいろな写真で顔認識プログラムを実行した結果。
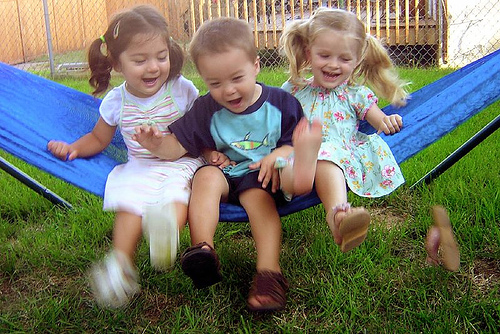
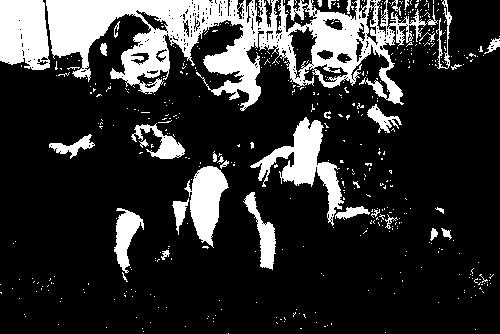
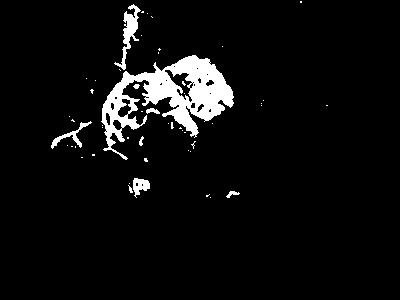
Sample10
Happyness on Flickr - Photo Sharing! (by zanzibar).
まずはやっぱり雰囲気のよい子どもたちの写真で。
Sample11
Waiting for their turns 1 on Flickr - Photo Sharing! (by tanakawho).
お祭りかな?
Sample12
Navidad hogarena on Flickr - Photo Sharing! (by Vedia).
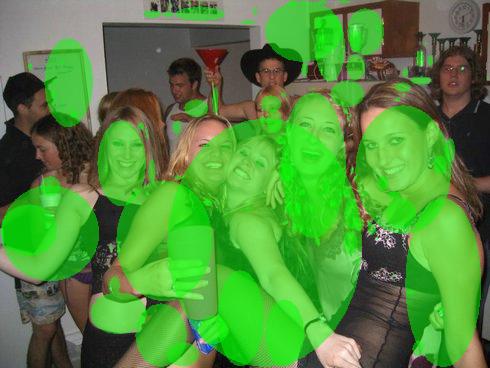
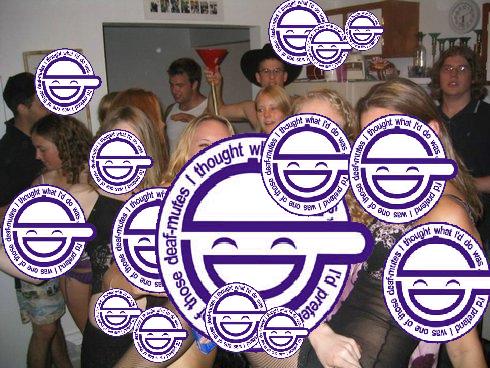
何のパーティ? 肌の露出が多い写真は顔以外がひっかかってしまう。

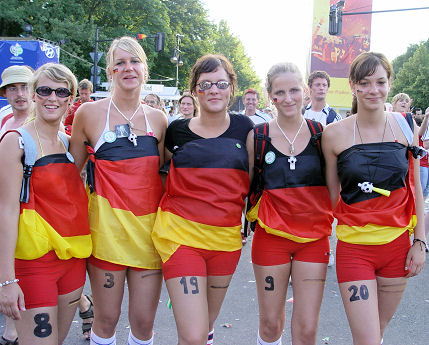
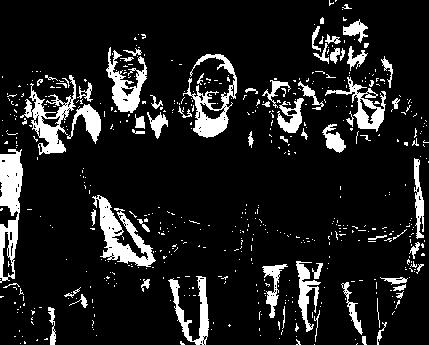
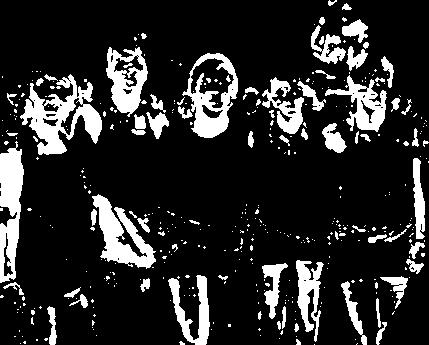
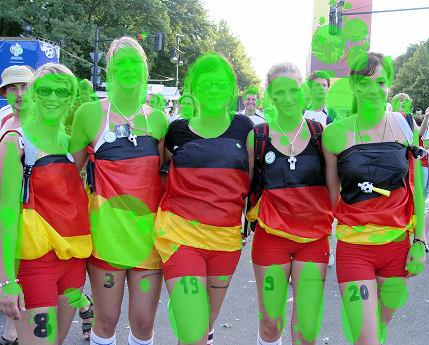
Sample13
wm_berlin_rene_259 on Flickr - Photo Sharing! (by Rene_Berlin).
これは写真が良いこともあって、なかなかきれいに認識している。

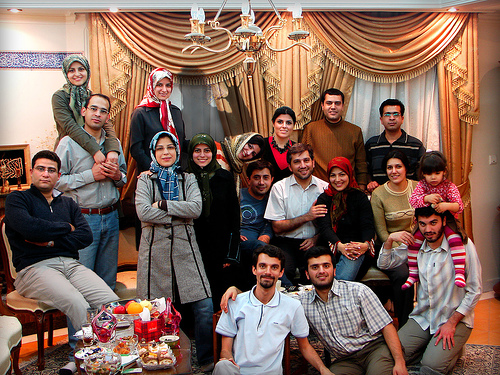
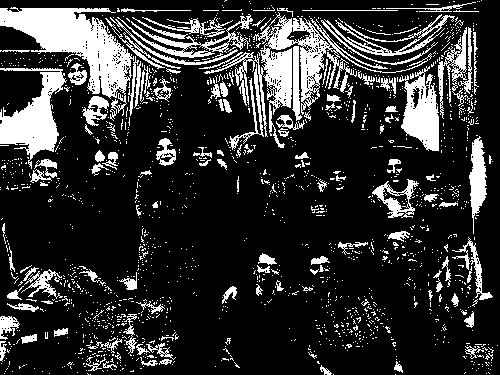
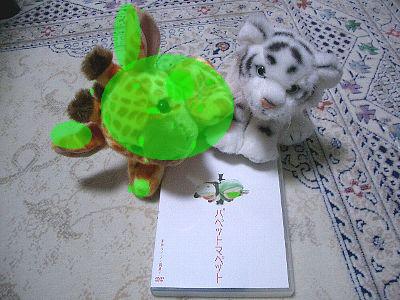
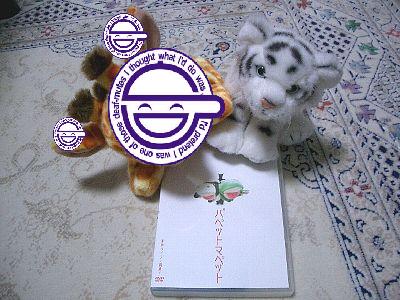
Sample14
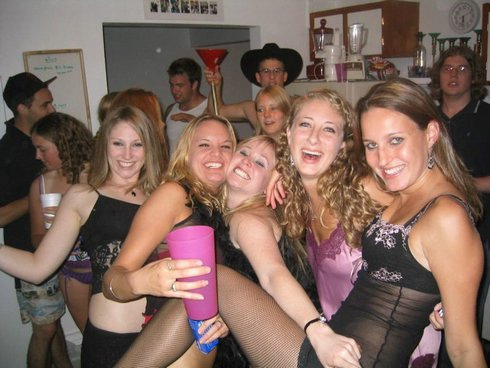
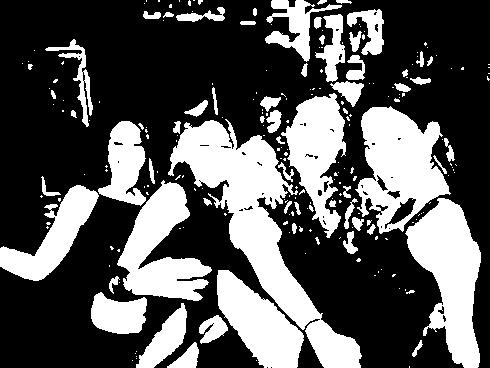
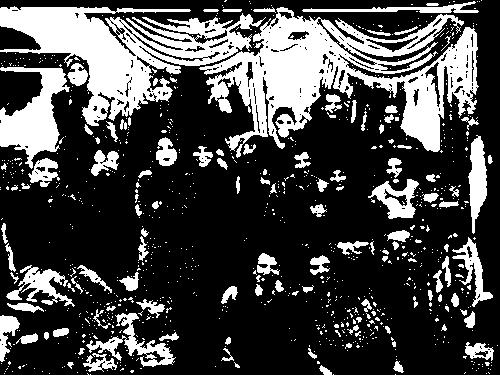
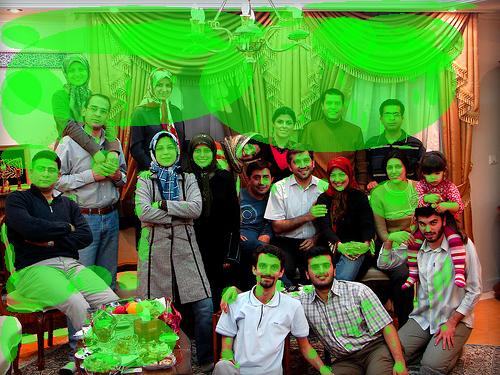
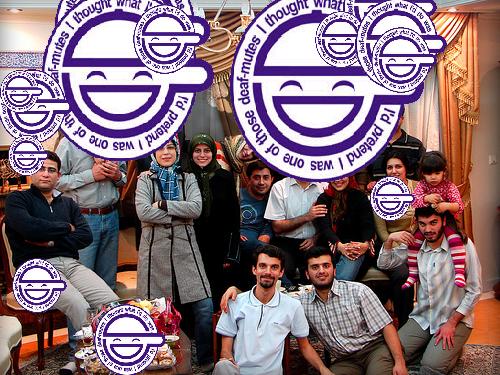
Home Party on Flickr - Photo Sharing! (by Hamed Saber).
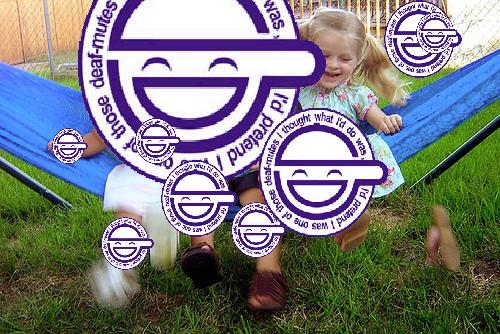
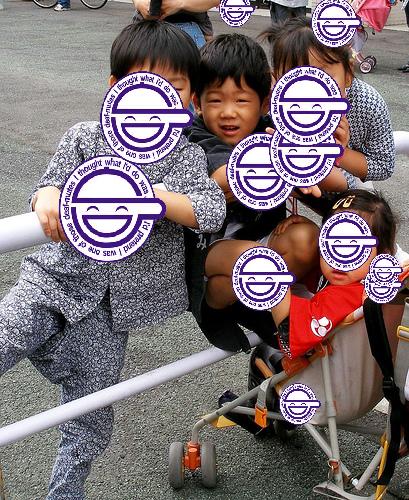
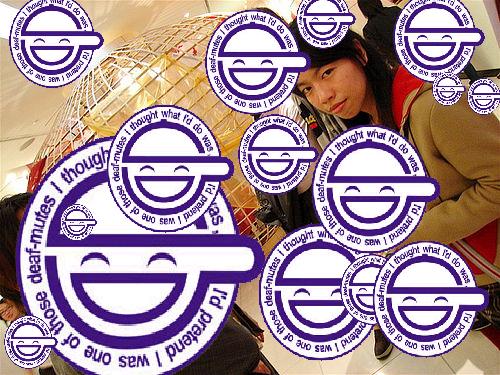
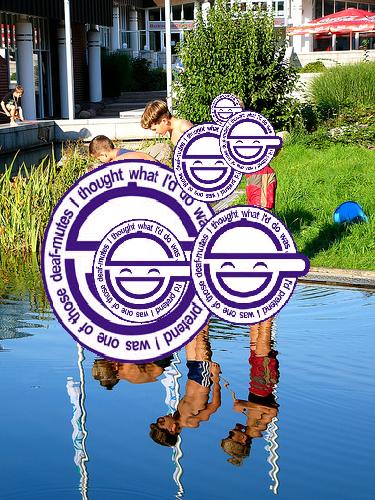
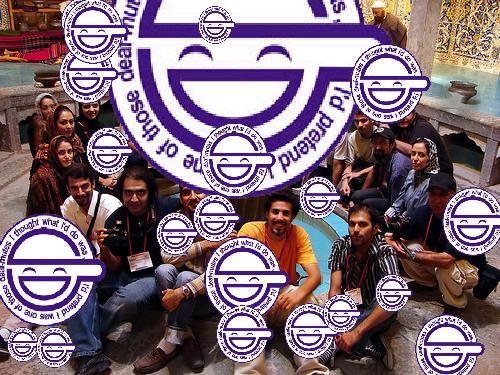
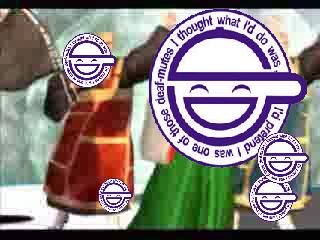
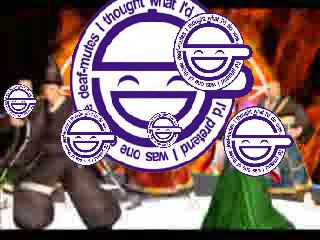
今回は、小さい領域には『笑い男』を貼ってない。
小さすぎる『笑い男』はキモい画像になってしまうから。サブイボ。
Sample15
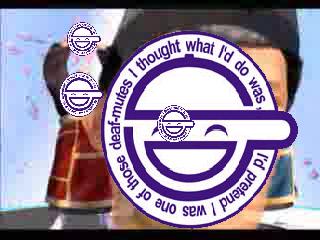
みんなで集合写真3 on Flickr - Photo Sharing! (by ryumu).
元々の写真に『笑い男』がついてたり。
Sample16
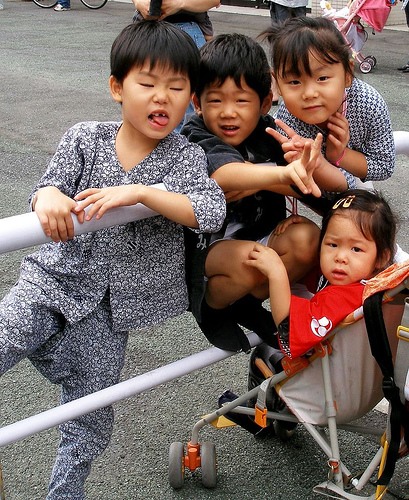
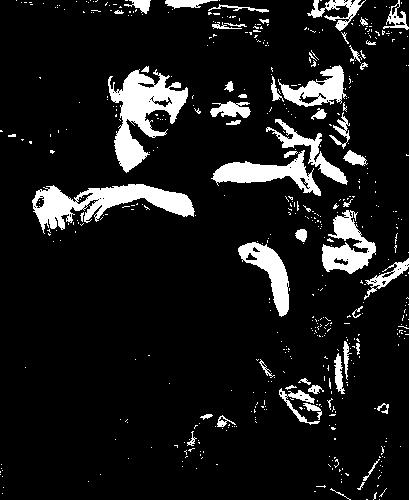
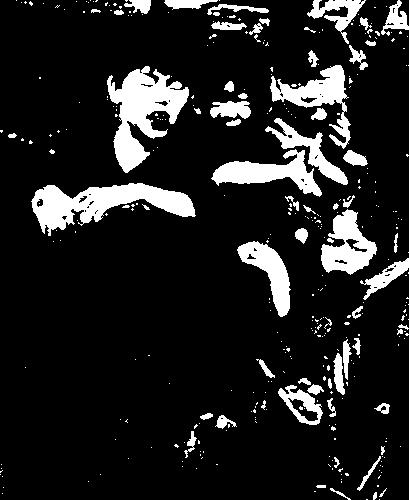
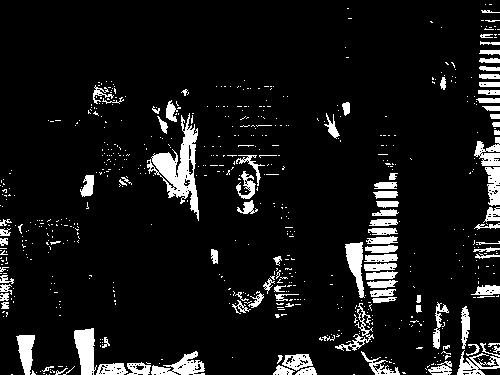
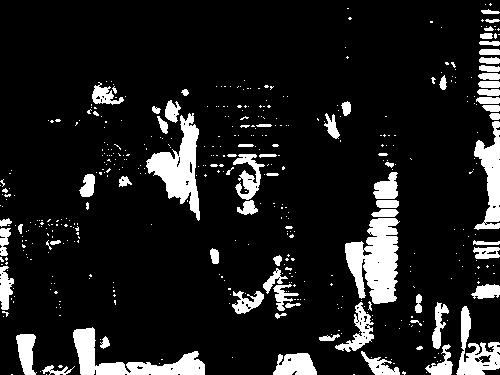
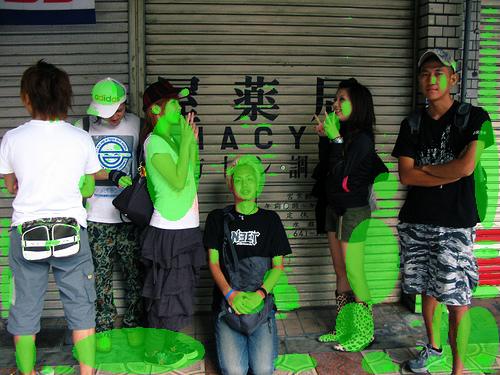
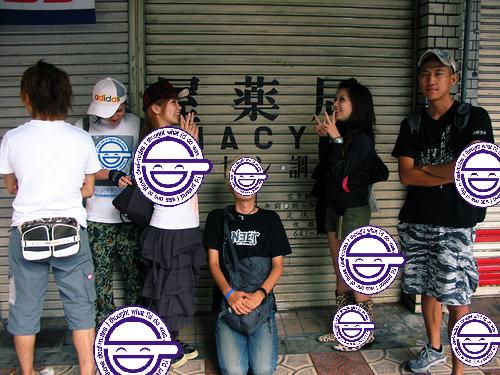
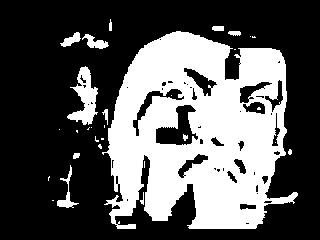
DSC02765.JPG on Flickr - Photo Sharing! (by yi-han ,kouko).
色の判定がまずいっぽい。領域デカすぎ。

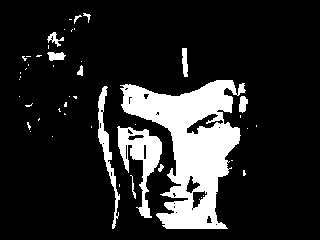
Sample17
beginning of fall - warm as summer on Flickr - Photo Sharing! (by gin_able).
横向きだし、肌の露出が多い少年たち。
うーむ、顔認識むずい。

Sample18
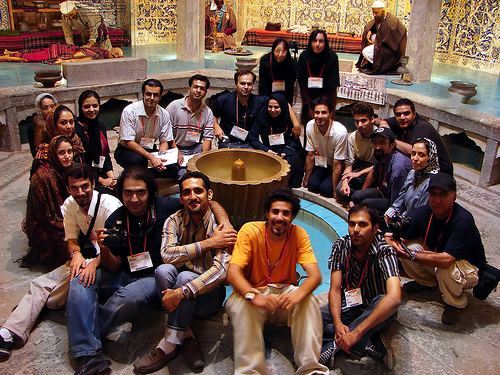
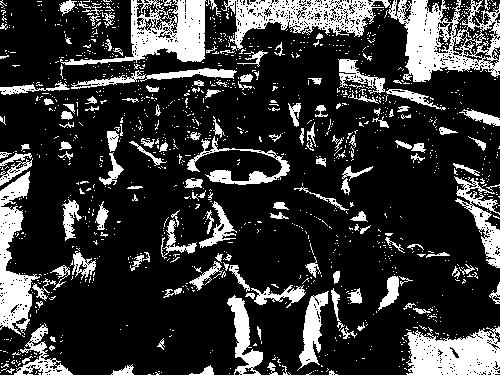
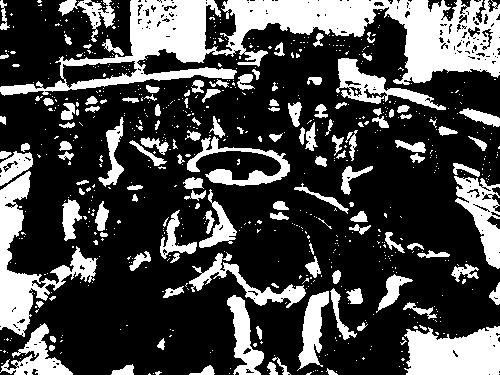
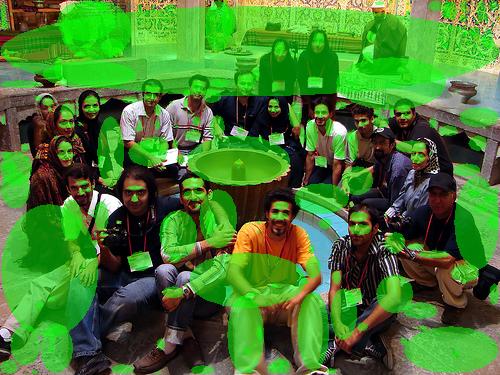
All of Us in AliGholi-Agha Traditional Bath on Flickr - Photo Sharing! (by Hamed Saber).
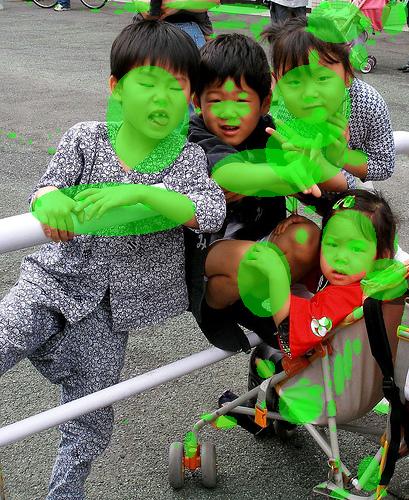
けっこう顔にヒットしている。ひとりひとりの顔の領域が小さいので「笑い男」は貼られない。
Sample19
Pink on Flickr - Photo Sharing! (by owen-jp).
なかなかうまいところを隠してる。
Sample20
i am a cheap jap!: We did mamemaki.
ぬいぐるみ写真にも挑戦。
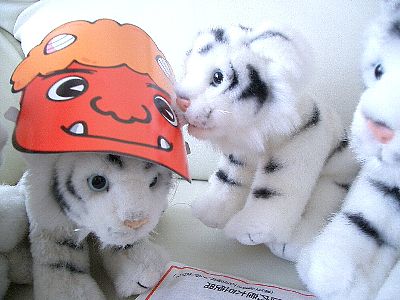
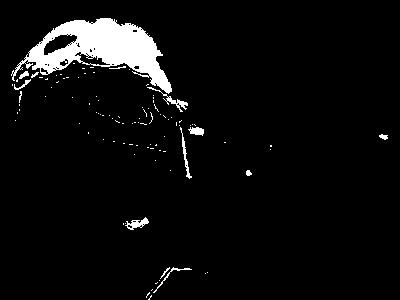
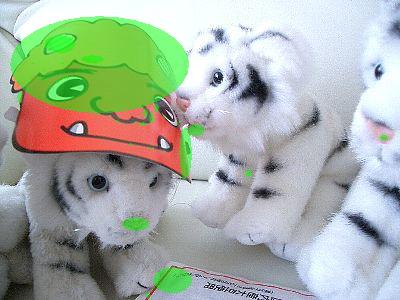
なぜか鬼の面にヒットしている。赤い色だからかな。
Sample21
i am a cheap jap!: PuppetMuppet Live Engi
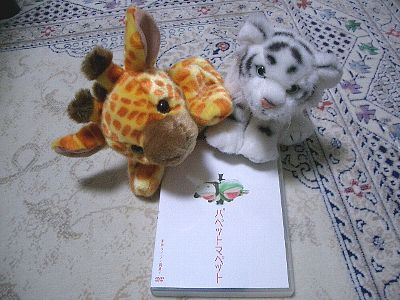

きりんくんにヒット。
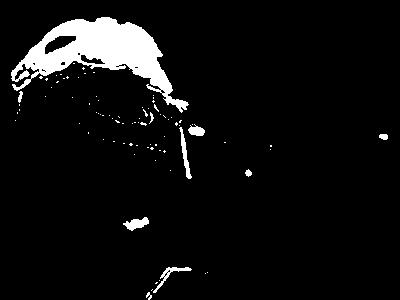
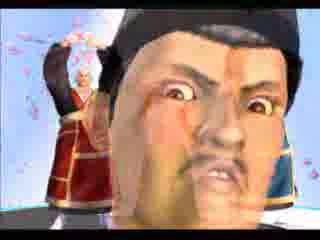
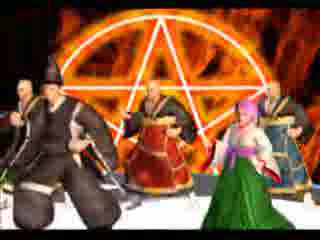
Sample22
うさんくさい男 ⇒ 矢部野彦麿。人は彼を陰陽師と呼ぶ。
画像は「レッツゴー!陰陽師」より。
動画が楽しい: i am a cheap jap!: Let's go! Onmyoji

Ref. 「陰陽師」はなぜ削除されなかったのか - "豪血寺"サントラCDが発表 | ネット | マイコミジャーナル
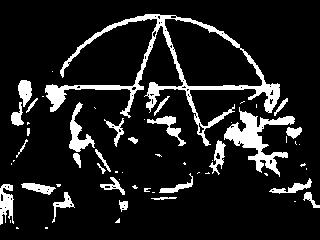
Sample23
矢部野彦麿 with 坊主ダンサーズ
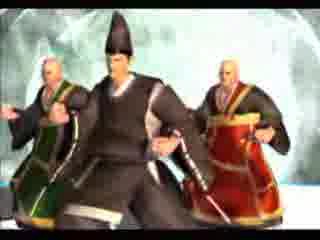

Sample24
琴姫 with 坊主ダンサーズ

Sample25
矢部野彦麿どアップ。


Sample26
矢部野彦麿&琴姫 with 坊主ダンサーズ フルメンバー登場。

顔認識/顔抽出プログラム ソースコード
というか肌色抽出というか。
以下、長々とソースコード。
動作環境は Java 5
使っている外部ライブラリは BlobDetection library / v3ga のみ。
Sample.java
package facedetection;
import java.awt.image.*;
import java.io.*;
import javax.imageio.*;
import blobDetection.*; // BlobDetection 使用
public class Sample {
public static void main(String[] args) throws Exception {
// The image 'warai.png' from
// 「顔面認識→笑い男貼り付け」ツールを Ruby で書く - にっき (2007-03-12)
// http://elpeo.jp/diary/20070312.html#p03
BufferedImage laughingManImage =
ImageIO.read(new File("warai.png"));
for(int i=10; i<=26; i++){
String f1 = "sample" + i + ".jpg";
String f2 = "sample" + i + "_2.jpg";
String f3 = "sample" + i + "_3.jpg";
String f4 = "sample" + i + "_4.jpg";
String f5 = "sample" + i + "_5.jpg";
BufferedImage b1 = ImageIO.read(new File(f1));
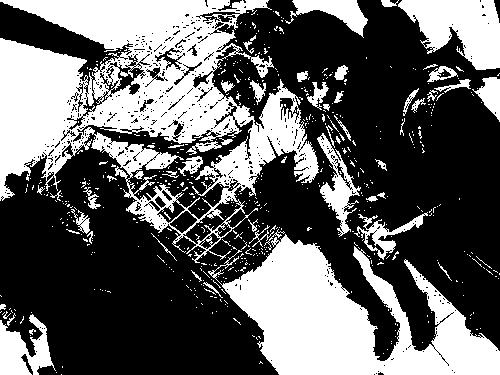
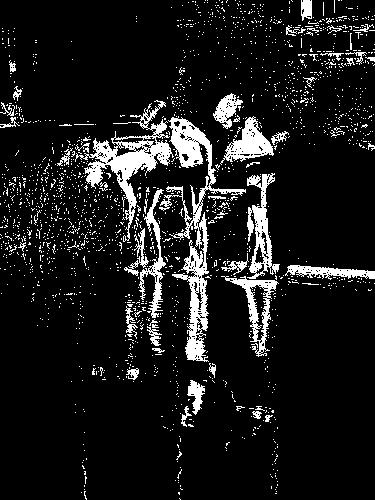
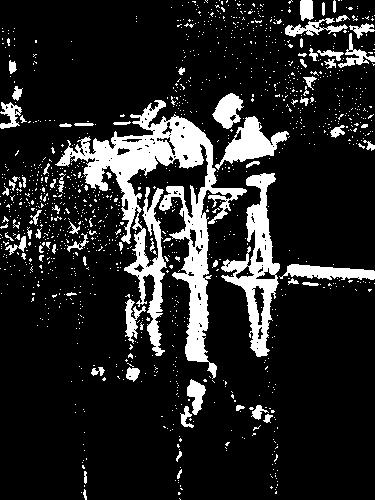
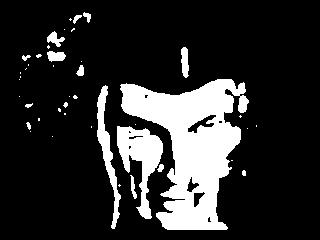
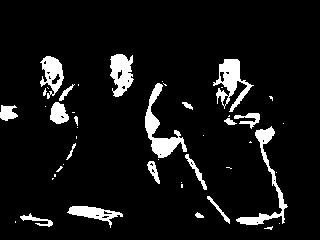
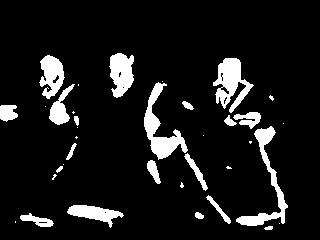
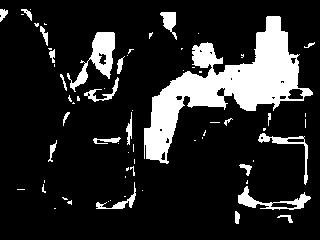
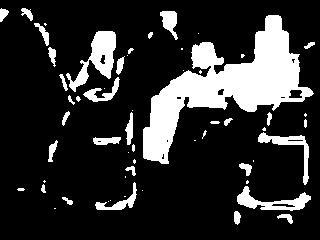
// 肌色部分を白色とする白黒2値画像を生成
BufferedImage b2 = FleshDetector.getFleshBinaryImage(b1);
ImageIO.write(b2, "jpeg", new File(f2));
// 白色部分を膨張化
BufferedImage b3 = Morphing.dilate(b2, 3); // 閾値周辺5ピクセル
ImageIO.write(b3, "jpeg", new File(f3));
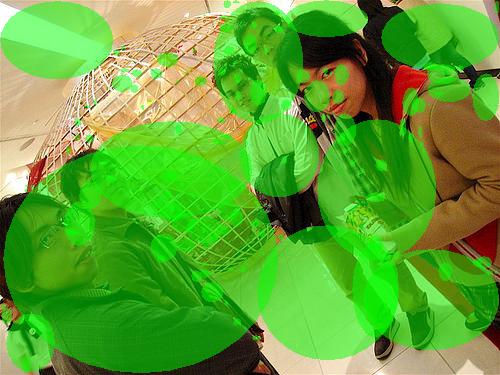
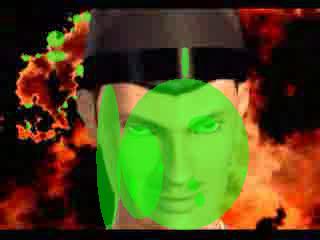
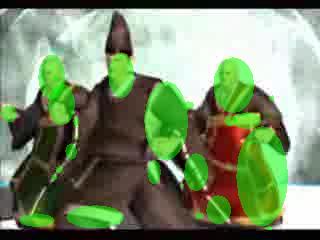
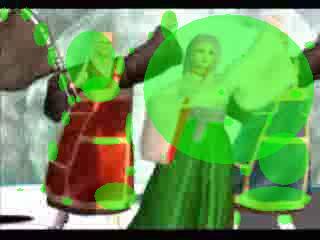
// BlobDetect にて肌色部分を取得
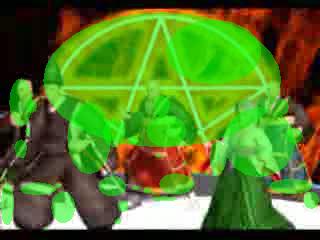
BlobDetection bd = FleshDetector.detectWhite(b3);
// 肌色認識部分を図示
BufferedImage b4 = FleshEffector.drawBlobsAndEdges(b1, bd, true, false);
ImageIO.write(b4, "jpeg", new File(f4));
// 肌色認識部分に笑い男貼り付け(The Laughing Man Hacks Them!)
BufferedImage b5 = FleshEffector.drawImage(b1, bd, laughingManImage);
ImageIO.write(b5, "jpeg", new File(f5));
}
}
}
Yuv.java
package facedetection;

/**
 * YUV(YCrCb)表色系。
 */
public class Yuv {

  public final double y;
  public final double u;
  public final double v;

  public Yuv(int r, int g, int b){

    //  Ref.
    //
    //  - YUVフォーマット及び YUVとRGBの変換
    //    http://vision.kuee.kyoto-u.ac.jp/~hiroaki/firewire/yuv.html
    //
    //  - C MAGAZINE 2003.5 「画像処理を極めるアルゴリズムラボ 第44回 色の表現」
    //

    y = (+ (0.2989 * r) + (0.5866 * g) + (0.1145 * b)); // 0~255
    u = (- (0.1687 * r) - (0.3312 * g) + (0.5000 * b)); // -128~127
    v = (+ (0.5000 * r) - (0.4183 * g) - (0.0816 * b)); // -128~127
  }

}
FleshDetector.java
package facedetection;

import java.awt.*;
import java.awt.image.*;

import blobDetection.*;

/**
 * 肌色探知機。
 */
public class FleshDetector {

  public static BlobDetection detectFaces(BufferedImage src){

    // 肌色部分を白色とする白黒2値画像を生成
    BufferedImage bin = getFleshBinaryImage(src);

    // 白色部分を膨張化
    BufferedImage dil = Morphing.dilate(bin, 5);

    // BlobDetect にて肌色部分を取得
    BlobDetection bd = detectWhite(dil);

    return bd;
  }

  static BlobDetection detectWhite(BufferedImage cs) {

    Blob.MAX_NBLINE = 4000; // default 4000
    BlobDetection.blobMaxNumber = 1000; //default 1000

    BlobDetection bd = new BlobDetection(cs.getWidth(), cs.getHeight());
    bd.setPosDiscrimination(false);
    bd.setThreshold(0.38f);
    int[] pixels = cs.getRGB(
      0, 0, cs.getWidth(), cs.getHeight(),
      null, 0, cs.getWidth());

    bd.computeBlobs(pixels);

    return bd;
  }

  /**
   * 肌色部分を白とした白黒2値画像を返します。
   * @param src 写真等のカラー画像
   * @return 肌色部分を白とした白黒2値画像
   */
  public static BufferedImage getFleshBinaryImage(BufferedImage src) {
    BufferedImage dst = new BufferedImage(src.getWidth(), src.getHeight(),
        BufferedImage.TYPE_INT_RGB);
    for (int x = 0; x < src.getWidth(); x++) {
      for (int y = 0; y < src.getHeight(); y++) {
        Color c = new Color(src.getRGB(x, y));
        //Yuv yuv = new Yuv(c.getRed(), c.getGreen(), c.getBlue());
        if (isFlesh(c)) {
          dst.setRGB(x, y, Color.WHITE.getRGB());
        } else {
          dst.setRGB(x, y, Color.BLACK.getRGB());
        }
      }
    }
    return dst;
  }

  private static boolean isFlesh(Color c) {

    Yuv yuv = new Yuv(c.getRed(), c.getGreen(), c.getBlue());
    if ((c.getRed()   >  40) &&
        (c.getGreen() >  40) &&
        (yuv.y + 16   > 145) &&
        (yuv.v + 128  < 173) &&
        (yuv.v + 128  > 133) &&
        (yuv.u + 128  < 127) &&
        (yuv.u + 128  > 77)) {
      return true;
    } else {
      return false;
    }
  }

}
Morphing.java
package facedetection;

import java.awt.*;
import java.awt.image.*;

/**
 * 画像加工。
 */
public class Morphing {

  /**
   * 白い部分を膨張させる画像処理(Dilation)をかける。
   * @param src binary image (white and black)
   * @param limit neighbors
   * @return binary image (white and black)
   */
  public static BufferedImage dilate(BufferedImage src, int limit){

    // Ref.
    // - Visual C++ 6.0を用いた易しい画像処理(14)-- 赤色を抽出し、拡張し収縮 --
    //   http://homepage3.nifty.com/ishidate/vcpp6_g14/vcpp6_g14.htm

    int w = src.getWidth();
    int h = src.getHeight();
    BufferedImage dst = new BufferedImage(w, h, BufferedImage.TYPE_INT_RGB);
    for(int y=0; y<h; y++){
      for(int x=0; x<w; x++){
        if(!isOn(src, x, y)){
          // 対象のピクセル周辺の白いピクセルの個数がlimit以上であれば、
          // 対象ピクセルを白にする
          if(isOnByNeighbors(src, x, y, limit)){
            dst.setRGB(x, y, Color.WHITE.getRGB());
          }else{
            dst.setRGB(x, y, Color.BLACK.getRGB());
          }
        }else{
          dst.setRGB(x, y, Color.WHITE.getRGB());
        }
      }
    }
    return dst;
  }

  // 画素の周辺画素の白の数が しきい値以上になったら true を返す
  private static boolean isOnByNeighbors(BufferedImage image, int x, int y, int limit){
    int w = image.getWidth();
    int h = image.getHeight();
    //check the neighboring pixels for (x,y)
    int num = 0;
    for(int yy=y-1; yy<=y+1; yy++){
      for(int xx=x-1; xx<=x+1; xx++){
        if(0 <= xx && xx < w && 0 <= yy && yy < h){
          if(isOn(image, xx, yy)){
            num++;
            if(num >= limit){
              return true;
            }
          }
        }
      }
    }
    return false;
  }

  // 画素が白の場合に true を返す
  private static boolean isOn(BufferedImage image, int x, int y){
    return Color.WHITE.equals(new Color(image.getRGB(x, y)));
  }


}
FleshEffector.java
package facedetection;

import java.awt.*;
import java.awt.geom.*;
import java.awt.image.*;

import blobDetection.*;

/**
 * 肌色加工機。
 */
public class FleshEffector {

  public static BufferedImage drawImage(
      BufferedImage src, BlobDetection bd, BufferedImage smudger) {

    int w = src.getWidth();
    int h = src.getHeight();

    // 貼り付ける画像サイズの1/6以下は、貼り付けない閾値
    double smudger_min_size = (smudger.getWidth() + smudger.getHeight()) / 2.0 / 6.0;

    BufferedImage dst = new BufferedImage(w, h, BufferedImage.TYPE_INT_RGB);
    Graphics2D g = dst.createGraphics();
    g.drawImage(src, 0, 0, null);

    for (int n = 0; n < bd.getBlobNb(); n++) {

      Blob b = bd.getBlob(n);

      if (b != null) {
        double ww = b.w * w;
        double hh = b.h * h;
        double size = (ww + hh) / 2.0;
        double limit = size;
        if(limit > smudger_min_size){
          double x = (b.xMax + b.xMin) * w / 2.0 - (size / 2.0);
          double y = (b.yMax + b.yMin) * h / 2.0 - (size / 2.0);
          g.drawImage(smudger, (int)x, (int)y, (int)size, (int)size, null);
        }
      }
    }

    g.dispose();
    return dst;
  }

  public static BufferedImage drawBlobsAndEdges(
      BufferedImage src, BlobDetection bd,
      boolean drawBlobs, boolean drawEdges) {

    int w = src.getWidth();
    int h = src.getHeight();

    BufferedImage dst = new BufferedImage(w, h, BufferedImage.TYPE_INT_RGB);
    Graphics2D g = dst.createGraphics();
    g.drawImage(src, 0, 0, null);

    for (int n = 0; n < bd.getBlobNb(); n++) {

      Blob b = bd.getBlob(n);

      if (b != null) {

        // Edges
        if (drawEdges) {
          g.setColor(new Color(0, 0, 255, 127)); // blue
          g.setStroke(new BasicStroke(1.0f));
          for (int m = 0; m < b.getEdgeNb(); m++) {
            EdgeVertex eA = b.getEdgeVertexA(m);
            EdgeVertex eB = b.getEdgeVertexB(m);
            if (eA != null && eB != null) {
              g.draw(new Line2D.Float(eA.x * w, eA.y * h, eB.x * w, eB.y * h));
            }
          }
        }

        // Blobs
        if (drawBlobs) {
          Shape s = new Ellipse2D.Float(b.xMin * w, b.yMin * h, b.w * w, b.h*h);
          g.setColor(new Color(0, 255, 0, 127)); // green
          g.fill(s);
          // いまいち見た目がきれいじゃないのでコメントアウト
          //g.setStroke(new BasicStroke(1.0f));
          //g.setColor(new Color(255, 0, 0, 127)); // red
          //g.draw(s);
        }
      }
    }

    g.dispose();
    return dst;
  }

}
改善できそうなところ
・近い肌色領域や重なっている肌色領域をつなげて、ひとつの肌色領域にする。ぐらいかなぁ……
Ref. 顔認識プログラムと笑い男 (NI-Lab.'s MemoWiki - TheLaughingManHacksYou)
あと face detection and recognition (by Alan Chatt, David Johnston,Kevin Lau and Ben Tindall) っていうのもあった。でも Java3D が必要だから見てないんだよなぁ……
tags: zlashdot Java Java
Posted by NI-Lab. (@nilab)
